


The Most Useful FoodSaver Tips and Tricks
After hearing my daughter rave about her FoodSaver, I started looking into vacuum sealers to find out if I was missing out by not yet having one of my own. I ended up finding so many great vacuum sealer tips that before I knew it, this blog post had more or less written itself!
Below, you’ll find 15 smart and practical FoodSaver tips and tricks — or any other brand of vacuum sealer! And if these vacuum sealer hacks end up persuading you to get one for your own kitchen, at least we’ll both be in good company! ;-)
For food-specific vacuum sealer tips that will save you money and reduce food waste, visit the link below!
Related: Want to Save on Food? This Is the One Kitchen Gadget You Need
15 Genius Vacuum Sealer Tips

1. Save by Buying in Bulk
You can save a considerable amount on your grocery bill by buying meat and veggies in bulk, or at least larger quantities than you might be used to. Portion them out into typical serving sizes, then vacuum seal and freeze whatever you won’t use right away.
Related: This Is What You Should (and Shouldn’t) Buy in Bulk
2. Avoid Spills in Transit
Going to a potluck? Avoid spills and accidents in transit by vacuum sealing your food beforehand. It’s also a great way to take food along without having to bring a container, which is a bonus if you tend to be forgetful about that sort of thing. ;-)

3. Make Your Own Microwave Meals
Make your own “ready meals!” Arrange your leftovers on a heavy-duty waxed plate, then slip the whole thing into a bag, vacuum seal it, and stash it in your freezer. Take one to work to microwave at lunchtime, and make sure to check the temperature often while it’s heating. (Every 30 seconds or so should do the trick!)
4. Freeze Bananas for Future Banana Bread
If you have bananas that have taken a downward turn in terms of freshness, keep them for a future batch of delicious homemade banana bread! Place your bananas in a bag, vacuum seal them, and store in your freezer until you’re ready.

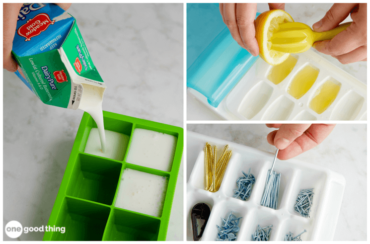
5. Freeze Portioned Citrus Juice
When a recipe calls for lemon or lime juice, you can’t beat the fresh stuff! Buy lemons and limes in season, juice them all at once, then freeze the juice in ice cube trays or a silicone mold. Place the frozen cubes in a FoodSaver bag, vacuum seal it, and store it in your freezer until needed.
If you just need a tablespoon or two of juice for a recipe, just remove one or two cubes at a time. If you need a lot, pull the whole bag out of the freezer, let the cubes thaw, then cut off a corner of the bag and pour out the juice.
Related: This Hack Gets the Most Juice Out of Limes and Lemons
Use Rolls to Make Bags of Any Size!
- While pre-cut bags are conveniently pre-sealed on one end, heat-seal rolls are a much more versatile option in many situations.
- With a roll, you can make bags as short or long as you want to avoid unnecessary waste.
- You can even make mini bags by cutting the roll down the middle (though you will have to seal an extra side!)
6. Make Breakfast Quick and Easy
Breakfast sandwiches are a great on-the-go option, but they can take some time to make. Speed things up considerably by assembling several at once, then seal them in individual bags and freeze them. Just heat up a sandwich in the microwave for a speedy and delicious breakfast!
More Ideas You'll Love


7. Keep Your Snacks Fresh
Instead of transferring uneaten potato chips to another container, use a FoodSaver to vacuum out most of the air out and seal the original bag to keep them fresh. (I say ‘most of the air’ because the vacuum cycle can crush fragile chips, though pretzels and other sturdier snacks can take the pressure!)
8. Save Seeds
Vacuum seal seeds from your garden to use next year (and the year after that, and the year after that…)

9. Prevent Toiletry Leakage
Avoid toiletry explosions when traveling by using your FoodSaver to seal them up in bags. You can virtually eliminate the chance of facing a gooey mess when you open your suitcase!
You can also seal your own survival kit with necessities like a flashlight, flares, matches, and first aid materials. It won’t take up a lot of space, plus it’ll be waterproof until you open it.
10. Preserve Photos
Keep photos safe from dust, dirt, and insects in a (gently) vacuum-sealed bag.

11. Shrink Your Yarn
Store and organize your yarn in vacuum sealed bags. Not only will it help keep your yarn dust- and tangle-free, but it will take up a fraction of the space too. (And if you use the extra space as an excuse to get even more yarn… well, your secret is safe with me.) ;-)
12. Pre-Freeze Wet Foods
To vacuum seal and save wet or moist foods, but it’s a lot easier if you freeze them first. Place the item on a cookie sheet and place it in your freezer to “flash-freeze.” Once the food is solid, slip it into your bag and vacuum seal it. This is a great way to store all sorts of delicious fruits while they’re in season, like peaches, berries, tomatoes, etc.
Related: How to Freeze 20 Foods to Save Money and Make Life Easier

13. Protect Seasonal Items
Seal up seasonal linens and clothes to keep them clean and dry until they’re needed. (This is another idea that could potentially save you a lot of storage space!)
14. Pre-Freeze Liquids
You can also use the “flash-freeze” method I described above to store liquids. Just pour the liquid into a traditional freezer bag or a shallow freezer-safe container. Place it in your freezer until it solidifies, vacuum seal the frozen disk/block of liquid in a bag. You can easily store your favorite soups and homemade broths for months this way.
More Ideas You'll Love


15. Make Your Own Honey Sticks
Use your vacuum sealer to make your own honey sticks. Just seal one end of a clear, plastic straw and then fill the straw with honey. Then seal the other side.
They’re a great way to take honey on-the-go for snacks or a cup of tea. They also make a thoughtful gift!
Do you have any vacuum sealer tips you would add to this list?


I purchased a hand held Food Saver system years ago. Since meat is our biggest expense, it makes sense to buy in bulk and break it into 1 lb servings. Since then, I’ve used it for so many things, including left over pizza and cheese sticks. Just make sure to invest in some good Sharpie pens and write down what’s in the bag before you fill it. Frozen chicken breasts can look a lot like pork chops when they are frozen LOL.
Please log in or create a free account to comment.I’ve been using a vac sealer for many years now. My first word of advice is that if you are planning to use your sealer a fair amount, purchase a good one, which is not one of the plastic toys you see in the big box stores. I went through four of those before I finally got smart and invested in a decent Westin machine. Secondly, do a bit of searching for your bags on line. Again, buying them at the big box stores is a complete rip-off. I buy ready made bags 1000 at a time, and for the odd larger or much smaller items, I have rolls that I can custom size by cutting and resealing the edges. And finally, if you are trying to freeze something really wet, like strawberries, do what we do, Clean them, cut them in half, sugar them, then carefully portion them into your bags and stand them in the freezer unsealed overnight to freeze solid, then first thing next morning just take them out and vac them down for permanent storage. Far easier and faster than pulling out a tray, spreading everything on said tray, then trying to find room in the freezer for it, and then having to pull it out and handle it all again to get it into freeezer bags.
Please log in or create a free account to comment.My husband and son are hunters and we were gifted a food sealer a few years ago. We do our own butchering and I love my vacuum sealer. No more mysterious bloody looking drips in the freezer. The amount of plastic generated is far less than the amount that comes home from a store. My tip is Mylar balloons – friends who have a party business occasionally receive balloons with seaming problems – heat sealer to the rescue!
Please log in or create a free account to comment.dont know about America but in Australia those bags are to expensive for a lot of things that are used reasonably regularly
Please log in or create a free account to comment.Same in the US! I used to use an oversized vacuum sealer bag for things like cubes of bouillon, lemon juice, crushed garlic. Cut open the bag, take what you need, reseal the bag – over time the bag shrinks in size so you have to start out with a lot of excess. And what a pain to do.
I now use a higher quality (‘freezer’ type) ZipLoc and just squeeze the air out of it, when it is something I’ll reopen and use fairly often. Or I might use a straw into a small gap in the zipper and suck the air out to remove a bit more air. Or, slowly lower the bag into cold water with just a small opening in the zipper left above the service, and close the zipper. The water forces the air out of the bag.
Please log in or create a free account to comment.One of my favorite items to use for vacuum sealing is a mason jar. I seal dried foods (my home dehydrated garden produce, purchased bulk items like nuts, flour, rice, etc.) in mason jars using the “accessory port” on my Food Saver and a jar sealer which can be purchased inexpensively from Amazon. This keeps foods fresh for a really long time, especially if the jars are stored in a cabinet well away from light. In this way, I store the items in pint, quart or half gallon jars depending on how quickly I use the item. This is a real money saver and also allows me to keep these items on hand without losing quality.
Please log in or create a free account to comment.I recently discovered that using the Foodsaver vacuun canisters is an fast and easy way to seal jars of whatever we want to save, We use the pasta sauce jars that are actually canning jars (measurements embossed on the jars), and their respective lids (yes, you actually can reuse the lids, contrary to popular belief). I purchased a pair of the canisters on ebay, a 1 gallon and a 1/2 gallon, at a very good price, and they are perfect for the job. Put whatever you want to save in the jar of your choice, snug the lid down, but not like you are King Kong, set the jar in the vac canister, put the lid on and vac it down using the accessory port and hose. Once it’s done vacuuming and the machine stops, just release the vacuum with the button on the top and you should hear your jar lid inside pop down and you’re good to go.If the lid doesn seal the first time, just open the canister and tighten the jar lid just a bit more and try again until it does.This is also a fantastic way to make refrigerator pickles that actually stay crunchy as well. Our favorite store bought pickles are Claussens, and the last ones we made taste like and are just as crispy as those. p.s. once your jar is sealed and you take it out of the vacuum canister, go ahead and finish tightening the lid down good.
Please log in or create a free account to comment.I always love reading your tips, but this one has made me reconsider selling my vacuum sealer. I tried to seal meat and never got it to work properly, even if I flash froze it. I am going to pull the sealer out and try some other of your suggestions. Maybe I will get the hang of it and try sealing food portions again later. Thank you!
Please log in or create a free account to comment.In Australia, I use ice cube bags for my lemon and lime juice . Each cube is equal to 1 tablespoon.
Please log in or create a free account to comment.I considered buying a vacuum sealer, until I saw a post online that suggested sealing plastic bags with an ordinary iron. You have to cover the section of the plastic you are going to press and seal with either grease proof paper or tin foil. This stops the plastic from melting onto the iron-plate, and ruining your iron. You then remove the paper or foil (which can be reused), and you have a perfect seal.
To remove air, I push the air out of the bag with my fingers, and then use the above method to seal.
This method saves you having to buy an expensive piece of equipment that takes up space in your kitchen. I have used it on even the cheapest plastic bags, to good effect.
Please log in or create a free account to comment.Hi. If you’re sealing non-stop items, or things that don’t require that all the air be expelled, use a Impulse Heat Sealer. The bags come in a long roll you can cut to size and are way cheap! Yes you can use it for food also n freeze. It also reseals prepackaged bags also.
Please log in or create a free account to comment.I’m on my third vacuum sealer. I use it that much. I live alone and I buy in bulk and portioned items just last so long in the freezer or the fridge. I’ve converted so many friends to using it. One thing I’ve seen done is to seal your polished silver after the holidays. The bags will keep out moisture and prevent tarnish. Be careful of sharp points, though, they can poke holes in the bags. Get around that by cushioning the points with a napkin or some other cloth. I’ve saved so much food over the years by vacuum sealing. Also, if you are going to be on the water or camping, keep your matches, candles, flares and batteries safe even if they fall in the water. Thanks for the post!
Please log in or create a free account to comment.This is the first time am reading that vacuum sealer can be used in many ways that make our packing neat and safe. This article is really an awesome idea which helps every woman to make beautiful packing while moving to outdoor. Honey sticks is the brilliant idea this is the one I loved a lot in this article. Thank you for this innovative idea.
Please log in or create a free account to comment.They are also great for ice packs that won’t leak and they’re reusable. You can cut the bags to make any size you want/need. I used one of the rolls to make 2 large ice packs to fit in my cooler… they lay flat on the bottom and top so there’s more room to put food and drinks in. They can be stored in the cooler, too, until I need them again. Just seal the bag without using the vacuum. Make sure the bag is completely dry at the sealing point, if not you won’t get a good seal, water will leak out and air can get in (for when you’re sealing food). I also made small ice packs using the water and alcohol method to keep in the freezer for my kids’ bumps and bruises.
Please log in or create a free account to comment.Jillee, your comment about harvest produce reminded me, you can freeze complete unhusked cobs of corn. The taste is as close as you can come to fresh corn in those depressing late winter, early spring days. Freeze thecorn as is and remove it as required throughout the year. The main drawback is the cornsilk. It is a little more difficult to remove prior to cooking.
Please log in or create a free account to comment.It is surprising how much flavour actually comes from the corn husks. No wonder tomales? are such a popular treat.
All I see when I read this is the terrific amount of waste it generates. And that waste is plastic, which NEVER goes away. Vacuum sealers are fun, yes, but the cost is not limited to the price of the machine and the wrap.
Please log in or create a free account to comment.I think perhaps the amount of food that is saved instead of going to waste could certainly help justify using one of these marvels! I bet the type of person who follows these tips are the very type to use and re-use and I sure wouldn’t think they should feel guilty about saving waste, time, and money!
Please log in or create a free account to comment.You can reuse your bags again and again. They get a little smaller each time but if you’re careful when you open them there is not much waste.
Are you able to seal ANY bag with a food sealer? Or only the bags specifically made for it?
Please log in or create a free account to comment.You can seal any thick bag – like chip bags! But if it’s a thin bag, like a ziplock baggie, then the FoodSaver will melt it!
Please log in or create a free account to comment.I am too cheap to use those bags on anything but food. They are expensive!
For travel I use ziplock bags, seasonal stuff goes into bins
Please log in or create a free account to comment.Don’t forget food savers not only use bags but also mason jars! Wide mouth or ref mouth, you can get special sealing caps at Amazon & other spots and save liquids and lettuce and all sorts of stuff like Halloween candy
Please log in or create a free account to comment.I use mine on my boat. I live on the boat so keeping salt air out of items is important for many reasons.
Please log in or create a free account to comment.Do you know if you can seal & freeze mushrooms?
Please log in or create a free account to comment.Absolutely!
Please log in or create a free account to comment.I make my own ice packs. 2 parts water, 1 part rubbing alcohol. Freeze, then transfer to FoodSaver bag.
Please log in or create a free account to comment.That’s a great idea!
Please log in or create a free account to comment.Great idea!
Please log in or create a free account to comment.Genius!
Please log in or create a free account to comment.Christening clothes and other special articles can be vacuum sealed for future generations. Safe from stains and insects.
Please log in or create a free account to comment.Great idea! Thanks!
Please log in or create a free account to comment.I am going to do this when i travel. What a great idea to make sure nothing leaks in your suitcase. Thank you for such a great trip.
Please log in or create a free account to comment.If you seal cosmetics etc in food saver bags, what do you do on the return trip, if all product isn’t used? ;-) ( take some resealable plastic bags with you for the return). I don’t travel much but I always put anything like that in the resealable plastic bags and have not had a problem
With the food saver bags, you have to plan for an ‘opener’ if you don’t have a scissors handy. You can’t tear them open. A letter opener with a razor type blade in it works and doesn’t take up much space if you don’t want to tote a scissors. In fact one came with one of my food savers.
I’ve had a food saver brand sealer for more than 30 years. In fact I’ve worn out two of them and am on #3. :-)
Please log in or create a free account to comment.I love my FoodSaver and use it a lot when special buys of meat are available at the grocery store. I also seal the chips bags as you said. One of the best things to have in the kitchen. Especially to reseal the cheese packs. It lasts so much longer in air tight seal.
Please log in or create a free account to comment.Thanks for all you tips Jillee!!!!
I seal the chip bags but never thought about cheese! Genius!! Thank you!
Please log in or create a free account to comment.Brilliant suggestions as usual Jillee
Please log in or create a free account to comment.FoodSaver OFTEN has a BOGO on their rolls and bags. Be sure to sign up for emails. I try to stock up each time they do this and use my FS for just about everything. I love the little re-sealable ‘ziplock’ type bags for cheese and lunch meat.
Please log in or create a free account to comment.I seal my silver flatwear to keep it from tarnishing between uses.
Please log in or create a free account to comment.So clever!
Please log in or create a free account to comment.I also buy Mylar bags for long term storage of dry foods, nuts and seeds. If you add an oxygen absorber packet to each bag it insures that the contents remain in a vacuumed state for long term storage. I use this method for storing flours, sugars, salt, grains like oatmeal, beans, rice, pastas, baking mixes like cake mix, biscuit mix and pancake mix. I also vacuum seal all my nuts in bags or mason jars and store in the freezer. I have walnuts that have been in my freezer for 5 years and still as fresh as when I packaged them. I also vacuum seal coconut, raisins and chocolates in bags or mason jars. To insure the mason jar lids stay vacuumed, I recommend using an oxygen absorber packet in each jar. It may be an extra investment in packaging, but when my lights go out during a natural or manmade disaster, I don’t have to panic and run to the store to see the empty shelves.
Please log in or create a free account to comment.Freeze individual cups of soup. After frozen place them in a large bag. When one or more are needed, trim off the end of the bag and remove individual pieces, then reseal the bag to go back into the freezer.
Please log in or create a free account to comment.I make chicken broth and anytime I have extra citrus juice I put in plastic ice trays. Then freeze then put in food saver bags @ about 2 Tablespoons each.
Please log in or create a free account to comment.I also have had my sealer for many years & found many other uses such as, if you go swimming I seal my wallet & keys so they don’t get wet. I vacuum seal a spear change of clothes to have in the trunk in case of emergency & they stay clean until I need them. There is to many uses to list, but you get the idea.
Please log in or create a free account to comment.Another use is: if you get the jar vacuum attachment, you can vacuum pack almost anything in your jars. I have a lot of vacuum packed flour. For powdery items, just use a coffee filter between the jar lid and the sealer. For liquids, use a paper towel to catch the liquids.
Yes, I use my sealer quite a bit. It is one of the most useful items I have in my house. Well, that and my mason jars, and canners.
Please log in or create a free account to comment.I’ve had mine for years and I love it. I buy chicken breast and slice each one length ways and bag them. Then when I make supper I take out two packages of chicken and a package of vegs. It’s not recommended to reuse the bags when you have used them for meats and chicken. You cannot sterilize them well enough to reuse. When the corn on the cob is in season we buy 12 cobs. I blanch them, let cool off and then bag each one separately. I have corn on the cob that I did up at least a couple years ago, ( I really wanted to have lots at that time) and they are still good at this time of year 2016. I put them in the steamer for about half hour and they turn out like they just came off the plant. I would never go without my machine. My husband picks wild blackberries every year. He will pick an ice cream bucket full and I put them in cold water and as they are floating I pick them out and make sure there are no bugs or things I don’t want. I put parchment paper on a cookie sheet and put the berries on that and put it in the deep freezer till the next day. Then I put them is vacuumed bags. When I want to make a blackberry pie I just take a bag out and dump the berries in the pie shell and cover with dough and bake. Beautyful pies…Fresh. I recommend every homemaker should have one.
Please log in or create a free account to comment.Like Phyllis, mine is on my counter and used constantly. I do wash the bags and reuse them so there is a lot less waste. One of my favorite uses is cheese. I buy in bulk and cut off a small piece to have as my usable and the large chunk gets sealed. It literally keeps forever, no more moldy cheese. I even find using the bags in the fridge for small items unsealed keeps things fresh longer than standard bags.
Please log in or create a free account to comment.Mine is on my counter since I do use it all the time. Like you said buying in bulk is probably the 2nd reason I use it so much. 1st would be we process any and all meat that the guys harvest from hunting. I don’t like waste either, so when I make my bags, I make them bigger than what I really need. Then after cutting it open to use, I wash it out, and can use the bag over, it’s just a bit smaller. When reheating in the plastic bag, I drop mine into boiling water.
Please log in or create a free account to comment.I have had one or many years. I don’t use it much. You really need to keep it on your kitchen counter and I don’t have the space. I think it uses too much plastic. You need extra over what your package needs in order for it to seal. Once you cut it open it is probably too small to seal again. Liquids are really hard to seal. Generally I freeze foods on a sheet and then package. However, freezer bags work just as well and are easily resealable. Mason jars work well too. I probably would not buy again.
Please log in or create a free account to comment.I have a food saver. Some of your suggestions are good but again once you open it it is no good,will you have to reseal it. If you open the top and take out the amount you need you can indeed reseal it. But basically packaging in individual use is the way to go and I agree it is way too much plastic, and can get very expensive. I also struggle with ceiling items that have any water content at all.
Please log in or create a free account to comment.If I were to ponder purchasing one again, I’m not sure I would. I get the same results by freezer bags and sucking the air out with a straw manually…… And with that method I can do it time and time again with the same bag
I have a vacuum sealer made by Ary. It’s much cheaper than FoodSaver, and the bags/rolls are cheaper too. I got it on Amazon from the manufacturer.
Please log in or create a free account to comment.My first reaction was please – no more plastic on any food. Use glass containers that are reusable. We have so much plastic in our landfills and oceans right now that will be there forever- it doesn’t ever biodegrade. Please let’s not add any more. Thank you for your thoughtful consideration.
Please log in or create a free account to comment.I have used my vacuum sealer to seal the occasional use silver in a bag. Like the silver gravy boat that you bring out once every year or two. Just put it in, then seal it up. You don’t have to worry about polishing the next time you decide to pull out something silver for a special dinner.
Please log in or create a free account to comment.You forgot the Mason Jar. I seal crackers in the 1/2 gal size, they keep for years. I put extra brown sugar in a mason jar to keep it soft for long periods of time. Use small Mason Jars to keep spices fresh. If you do not have a jar adapter you can but the tube and jar adapter at Amazon. I also vacuum extra cereal in Mason Jars. Great for keeping food dry in humid summer weather.
Please log in or create a free account to comment.These bags aren’t mice proof either.
Please log in or create a free account to comment.I’ve had a food saver for years. I’ve used only the FoodSaver brand bags. You mention sealing pretzles and chips. Can any other bags be used? I’ve been afraid to try.
Please log in or create a free account to comment.I have a vacuum sealer & use it to reseal chips & crackers in their original bag. Don’t let the sealer go through a full cycle; just push the seal button when you get ready & the heat will seal those bags shut. Next time I want chips I cut off the seal of the bag, pour out as many as I want then reseal. This has saved me tons of money on chips that so stale before I eat them all.
Please log in or create a free account to comment.You can seal any bags that are thick, like chip bags! But avoid sealing thin, plastic wrap-like bags.
Please log in or create a free account to comment.The vacuum sealer can be used to protect important documents from water damage. This is especially important for those living in flood hazard areas.
Please log in or create a free account to comment.It is heat that causes the toxins in plastic to leach. It is best to microwave food in glass if you have concerns.
Please log in or create a free account to comment.Foodsaver bags are BPA free and food- grade quality plastic.
I have one and use it to do all precooked meals for beach camping holidays when there is a total fire band you can’t BBQ as such but you can boil water and heAt the precooked meals.
Please log in or create a free account to comment.Ok Julia I’m off to buy my vacuum sealer too thanks x
Please log in or create a free account to comment.