


The moist environment of a pressure cooker is perfect for making cheesecake, and it’s why this Instant Pot Cheesecake is one of my all-time favorite Instant Pot recipes! Ovens aren’t great at retaining moisture, but this pressure cooker cheesecake recipe always turns out fluffy, moist, and perfectly smooth.

Jillee’s Take:
To learn more about the Instant Pot, be sure to check out my eBook Everything Instant Pot! You can buy it in my shop, or get it for free if you’re an OGT Plus member!

Easy Instant Pot Cheesecake Recipe
Equipment:
- Instant Pot (6-qt capacity or higher)
- 7” springform pan
- Aluminum foil OR silicone pressure cooker sling
- Food processor
- Wire cooling rack
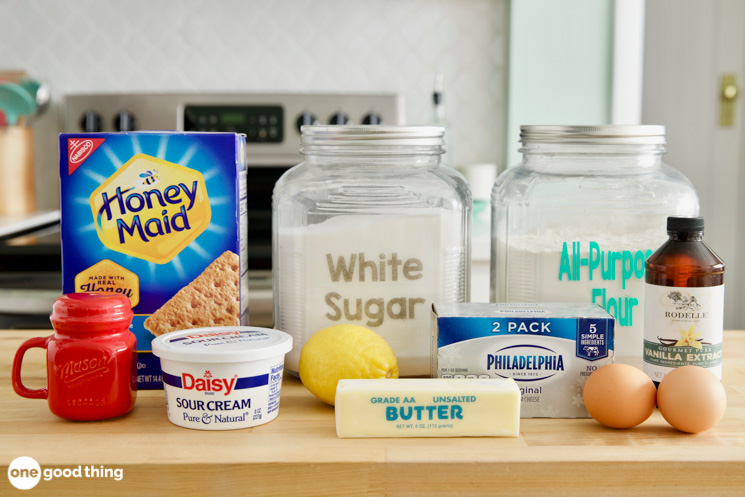
Ingredients:
- 1 1/4 cups crushed graham crackers
- 5 Tbsp butter, melted and cooled
- 1 lb (16 oz) cream cheese
- 1/2 cup sugar
- 2 large eggs
- 1/4 cup sour cream
- 2 tsp lemon zest
- 1 Tbsp fresh lemon juice
- 1/2 tsp vanilla extract
- 1/4 tsp salt
- 1 1/2 Tbsp all-purpose flour
Directions:

Step 1 – Prepare The Crust
Start by generously greasing the inside of your springform pan with either butter or cooking spray.
Stir the crushed graham crackers and melted butter together in a mixing bowl, then pour the mixture into the greased pan.
Use your fingers to press the mixture into an even layer of crust that covers the bottom of the pan and rises about halfway up the sides.

Step 2 – Prepare The Filling
Next, put the cream cheese and sugar into your food processor and process until smooth (about 1 minute).
Add the eggs one at a time, processing each until smooth. Scrape down the sides of the processor and add the sour cream, then process again until smooth.
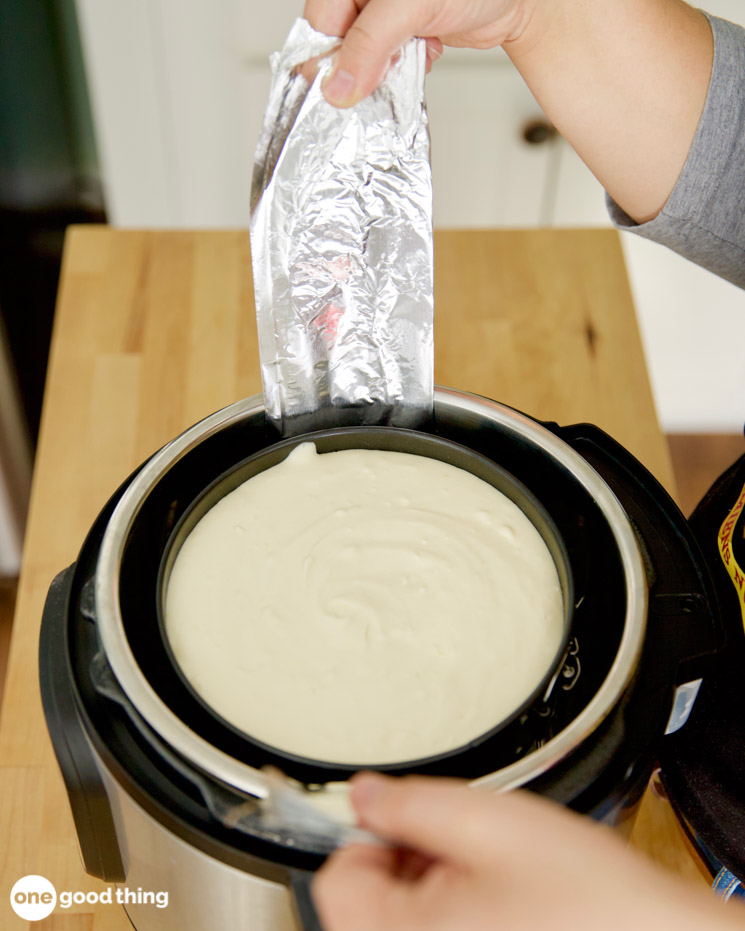
Add the lemon zest, lemon juice, vanilla, and salt, then process again. And finally, add the flour (either standard or gluten-free) and process for 1 minute to ensure a silky smooth texture. Pour the finished filling into your prepared crust.
Step 3 – Cook
Set a trivet into the bottom of your Instant Pot, then pour in about 1 1/2 cups of water. Fold a long piece of aluminum foil into a narrow sling, and use it to lower your prepared cheesecake pan into the pot. (Another option is to use a silicone pressure cooker sling, which acts as both a sling and a trivet in one! It’s one of my favorite Instant Pot accessories.)
Put the lid on your Instant Pot and make sure the valve is set to “Sealing.” Select “Pressure Cook” and set for High pressure for 25 minutes, with the “Keep Warm” setting turned off.
When the timer goes off, make sure the Instant Pot is turned off. Use Natural Release by allowing the pot to depressurize on its own, which typically takes around 20 minutes. (Patience is a virtue when it comes to this cheesecake, so hands off!) ;-)
More Ideas You'll Love


Step 4 – Cool And Serve
After the lid unlocks, use the sling to carefully remove the finished cheesecake. Place it on a wire rack to cool for 15 minutes, then place it in your fridge to chill for 1 hour. Cover the pan with plastic wrap or tin foil, and chill for at least 1 more hour (or up to 2 days).
To serve, uncover the pan and run a thin knife or spatula between the pan and the cheesecake. Unlatch the sides of the pan and remove it from the base. Then slice and serve, or use a large spatula to transfer the cheesecake to a cake plate.
This cheesecake is utterly delectable as-is, so dig in! But if you want to kick it up a notch, check out my three tasty topping ideas below! :-)
BONUS: 3 Delicious Cheesecake Toppings
1. Jam Drizzle
Warm a small dish of raspberry or strawberry jam in the microwave for a few seconds until warm. Stir until smooth, then drizzle the warm jam over the top of your cheesecake.
2. Chocolate Drizzle
Warm your favorite chocolate sauce in the microwave for a few seconds, stir until smooth, then drizzle over your cheesecake.
3. Homemade Cherry Sauce
- Pour the contents of a 16-ounce bag of frozen cherries into a medium-sized saucepan. Add 1/2 cup of sugar and 1/2 cup of water, then bring to a boil over medium heat, stirring often.
- In a small bowl, whisk together 1 tablespoon of lemon juice and 2 teaspoons of cornstarch until smooth. Pour the slurry into the bubbling cherry mixture, and cook, stirring constantly until thickened (about 1 minute).
- Remove the mixture from heat and continue stirring until it stops bubbling. Let the finished cherry sauce cool for at least 30 minutes before serving with your cheesecake.

Frequently Asked Questions
What Is An Instant Pot Cheesecake?
An Instant Pot cheesecake is a variation of a classic cheesecake that cooks more quickly and conveniently. It’s light, fluffy, and delicious!
What Equipment Do I Need To Make An Instant Pot Cheesecake?
To make an amazing Instant Pot cheesecake, you need a food processor, Instant Pot, springform pan, and a heat-safe trivet with handles (or a sling — anything that helps you safely remove the pan from the pot!)
How Do I Prepare The Crust For Instant Pot Cheesecake?
To make the crust for an Instant Pot cheesecake, you can use crushed cookies or graham crackers combined with melted butter. Press the crumb mixture into the bottom of the springform pan before adding the cheesecake batter.
How Long Does It Take To Cook An Instant Pot Cheesecake?
Cook your cheesecake for 25 minutes on high pressure, with the Keep Warm feature turned off. (The total time will be a bit longer because it will take time for the pot to pressurize and depressurize.)
How Do I Release Pressure When Making Instant Pot Cheesecake?
After cooking is complete, allow the pressure in the pot to release naturally.
More Ideas You'll Love

Is This Instant Pot Cheesecake Recipe Gluten-Free?
The recipe isn’t gluten-free as written, but it’s easy to make it so! To make a gluten-free Instant Pot cheesecake, use gluten-free graham crackers and flour.
Conclusion
This Instant Pot Cheesecake recipe is by far the easiest recipe for cheesecake I’ve ever used, and I love that it turns out perfectly every time. No more cracked or heavy cheesecakes! If you love cheesecake (and who doesn’t?), you’ve got to try this recipe!
What’s your favorite way to eat cheesecake?

Instant Pot Cheesecake Recipe
Equipment
- Instant Pot
- Springform pan 7-inch
- Silicone pressure cooker sling or aluminum foil sling
- Food processor
- Cooling rack
Ingredients
- 1 1/4 cups crushed graham crackers
- 5 Tbsp butter melted and cooled
- 1 lb 16 oz cream cheese
- 1/2 cup sugar
- 2 large eggs
- 1/4 cup sour cream
- 2 tsp lemon zest
- 1 Tbsp fresh lemon juice
- 1/2 tsp vanilla extract
- 1/4 tsp salt
- 1 1/2 Tbsp all-purpose flour
Instructions
Step 1 – Prepare The Crust
- Start by generously greasing the inside of your springform pan with either butter or cooking spray.
- Stir the crushed graham crackers and melted butter together in a mixing bowl, then pour the mixture into the greased pan.
- Use your fingers to press the mixture into an even layer of crust that covers the bottom of the pan and rises about halfway up the sides.
Step 2 – Prepare The Filling
- Next, put the cream cheese and sugar into your food processor and process until smooth (about 1 minute).
- Add the eggs one at a time, processing each until smooth. Scrape down the sides of the processor and add the sour cream, then process gain until smooth.
- Add the lemon zest, lemon juice, vanilla, and salt, then process again. And finally, add the flour (either standard or gluten-free) and process for 1 minute to ensure a silky smooth texture. Pour the finished into your prepared crust.
Step 3 – Cook
- Set a trivet into the bottom of your Instant Pot, then pour in about 1 1/2 cups of water. Fold a long piece of aluminum foil into a narrow sling, and use it to lower your prepared cheesecake pan into the pot. (Another option is to use a silicone pressure cooker sling, which acts as both a sling and a trivet in one!)
- Put the lid on your Instant Pot and make sure the valve is set to “Sealing.” Select “Pressure Cook” and set for High pressure for 25 minutes, with the “Keep Warm” setting turned off.
- When the timer goes off, make sure the Instant Pot is turned off. Use Natural Release by allowing the pot to depressurize to on its own, which typically takes around 20 minutes. (Patience is a virtue when it comes to this cheesecake, so hands off!) ;-)
Step 4 – Cool And Serve
- After the lid unlocks, use the sling to carefully remove the finished cheesecake from the pot. Place it on a wire rack to cool for 15 minutes, then place it in your fridge to chill for 1 hour. Cover the pan with plastic wrap or tin foil, and chill for at least 1 more hour (or up to 2 days).
- To serve, uncover the pan and run a thin knife or spatula between the pan and the cheesecake. Unlatch the sides of pan and remove it from the base. Then slice and serve, or use a large spatula to transfer the cheesecake to a cake plate.


I really don’t like flour in my cheesecake and found this one that is also easy and delicious. Give it a try!
Please log in or create a free account to comment.https://rootitoot.com/recipes-and-cooking/desserts/rootitoot-cheesecake/
I bought all the ingredients without checking my springform pan size, and of course it’s too big for my instant pot! Silly me. Do you know the temperature and time you could bake this in the oven instead?
Please log in or create a free account to comment.nice
Please log in or create a free account to comment.My mom has made it for years in a 9×13 pan. I actually gave her a springform pan years ago.We ended getting rid of it because we couldn’t figure the darn pan out. We showed my brother in law who’s mother has one and even he couldn’t get it to work. I know you guys are probably dying laughing at me. Anyone know any tricks for these pans.
Please log in or create a free account to comment.The pan bottom needs to be covered in tin foil so if butter or batter comes out it doesn’t burn oven the whole sides and bottom metal plate from outside not inside,if you let it cool it will come away from sides of pan take tin foil off ,release sides, I take it off metal bottom and refrigerate a few hours on a pretty plate.
Please log in or create a free account to comment.That was the problem. Getting the darn sides to release. Luckily we hadn’t backed anything. Maybe we weren’t smart enough or the pan could have been defective- since even my brother in law couldn’t get it to work.
Mine is very simple – I just secure the clasp on the side while the bottom piece rests on the counter, they just snap together! Do you have a different type?
Please log in or create a free account to comment.I’ve actually made the cheesecake in my 3 qt IP. It is time consuming. I can use the 4” spring forms but can only cook 1 at a time. It makes for great individual cakes, takes a little over an hour total, and truly are delicious. So I do it for special occasions.
Please log in or create a free account to comment.Do you cut the recipe in half and end up with two? Is the cooking and cooling time the same?
Please log in or create a free account to comment.Thanks. Love all your tips. you have a great recipe for bread, can you give a wheat flour version?
Please log in or create a free account to comment.Wheat flour can be a little difficult to work with – I’ll have to start practicing! Stay tuned!
Please log in or create a free account to comment.what sort of wheat flour recipe are you looking for? Is it all-purpose flour OR WHOLE WHEAT FLOUR?
Please log in or create a free account to comment.The recipe says the to use a food processor but the picture shows a kitchen aid mixer. Which do you use?
Please log in or create a free account to comment.Whichever is closest – they both work wonderfully :-)
Please log in or create a free account to comment.This is still complicated. Try this, buy the pre made crust. Mix 8 oz.cream cheese,
Please log in or create a free account to comment.1 can sweet & condensed milk,
Lemon juice (1/3 cup)
vanilla (1 tsp.)
Mix, pour & cool. No baking & it’s delicious! I make this frequently
We’re on the keto diet and I’m very ill, so this is perfect. I’m nixing the crust, adding sour cream, stevia, powdered vanilla I make myself, and some lemon zest. Thanks for the post, I’ll take it from here, lol!!!
Please log in or create a free account to comment.With Lactos intollerance in the family we’ve opted to make “non-dairy” cheese cake using Tofu, and you would be surprised to know, it tasts BETTER than the real cheese cake.
Please log in or create a free account to comment.Recipe, please!
Please log in or create a free account to comment.