0 Comments

I want you to know that you can absolutely get Sharpie out of clothes with simple things you already have at home. My personal go-to is always rubbing alcohol—it really does work wonders at breaking down that stubborn ink.
What to Do When Sharpie Happens
Oh, that dreaded moment! You look down and see a dark Sharpie mark on your clothes. It feels so permanent, doesn’t it? The ink in those markers is made to bond with fabric fibers almost instantly, which is why moving fast is the single most important thing you can do.
The difference between tackling a stain within a couple of hours versus waiting a whole day is just massive. The entire goal is to dissolve the ink and lift it away before it gets too comfortable in the fibers of your favorite shirt!
The biggest mistake you can make with an ink stain is tossing the item in the dryer. That heat will set the ink permanently, making it nearly impossible to remove. Always, always air-dry the item first to be sure the stain is completely gone!

My Simple Stain-Fighting Plan
Before we get into the specific methods, my approach always follows a few key principles. It’s less about having a magic potion and more about having a smart strategy.
- Act Quickly: I can’t say this enough! The sooner you get to the stain, the better your chances are. Don’t let it sit.
- Protect Your Garment: Always, always place a paper towel or an old rag behind the stain. This is a crucial step to prevent the ink from bleeding through to the other side of the fabric while you work.
- Blot, Don’t Rub: Vigorously rubbing a stain can actually push the ink deeper into the fibers and make it spread. Gentle blotting is your friend here.
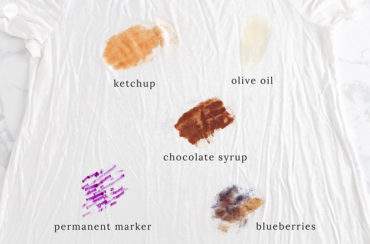
This helpful infographic breaks down those essential first steps for dealing with a permanent marker mishap.
As you can see, the core process is pretty straightforward: respond fast, grab the right tool for the job, and use the correct technique. For even more powerful stain removal strategies, I’ve got a whole guide on how to remove stains from clothes.
This same immediate-response mindset is useful for other household spills, too. If you’re dealing with a bigger mess, you might find some useful tips in my guide to cleaning carpet stains.

My Go-To Sharpie Removers: Rubbing Alcohol & Hairspray
Alright, let’s get down to business with my two most trusted ink stain fighters: rubbing alcohol and a simple can of aerosol hairspray. It might sound a little strange, but the alcohol in these products is a fantastic solvent for breaking down that stubborn permanent ink. I’ve used these tricks more times than I can count on everything from my kids’ school uniforms to my own favorite jeans.
Before you touch the stain, do this one crucial thing: place a paper towel or an old, clean cloth behind the stain. This simple prep step prevents the ink from bleeding through to the other side of the fabric while you work.
The Rubbing Alcohol Method
Once your protective layer is in place, it’s time to tackle that mark. Grab a cotton ball or a clean white cloth, get it damp with isopropyl alcohol (that’s just regular rubbing alcohol), and start gently dabbing the Sharpie stain. You’ll see the ink lift from your clothes and transfer to the cloth—it’s honestly so satisfying to watch!
Remember to dab, not rub! Rubbing can push the ink deeper into the fabric fibers and make the stain spread, which is the last thing we want. A gentle dabbing motion will lift the ink out and onto your cloth.
This isn’t just a trick I picked up; it really works! The alcohol is a powerful solvent that dissolves the ink right out of the fabric. It’s why this is always the first thing I reach for.

What If I Don’t Have Rubbing Alcohol?
No rubbing alcohol in the cabinet? No problem. An alcohol-based aerosol hairspray is a brilliant backup. The key is to check the ingredients for alcohol—the higher it is on the list, the better it’s going to work.
More Ideas You'll Love

Just spray it directly onto the stain, let it sit for about a minute to do its thing, and then blot it away with a clean cloth. This method has saved countless cotton t-shirts in my house!
Here’s a quick reference I use for choosing the best household remover for different common fabrics.
My Stain Remover Quick Guide
| Stain Remover | Best For These Fabrics | My Personal Tip |
|---|---|---|
| Rubbing Alcohol | Cotton, Polyester, Nylon | The absolute best for most everyday fabrics. Always test on a hidden spot first. |
| Hairspray | Cotton, Denim | Great in a pinch, especially on sturdy fabrics like denim. Check for a high alcohol content! |
| Hand Sanitizer | Polyester, Spandex Blends | The gel formula can be less drippy on synthetic materials. Dab gently. |
| White Vinegar | Wool, Silk | A much gentler option for delicate fibers. Blot, don’t soak. |
Remember, these are just starting points. Every fabric is different, so a quick spot test is your best friend.
The reason these techniques work so well is that alcohol acts as a solvent, breaking down the stubborn pigments in the ink. It’s a principle that applies to lots of other tough messes, too. And if you’re curious about other clever ways to use this household staple, check out these 11 uses for rubbing alcohol you might not have thought of.

A Gentler Approach for Delicate Fabrics
But what about that beautiful silk blouse or cozy wool sweater? Strong solvents like rubbing alcohol can be too harsh for these delicate fibers, potentially causing damage or discoloration. For those special items, we need a much gentler touch.
One of my favorite surprising solutions is plain old milk! I know it sounds a bit odd, but the fats and enzymes in milk can help break down and loosen the ink without being harsh on the fabric.
Simply pour some milk into a bowl and submerge the stained part of the garment. Let it soak for at least an hour, though I’ve left things for a few hours with great success. Afterward, gently rinse the area with cool water before laundering as usual.

Other Gentle Stain Fighters
If you don’t have milk on hand or want to try something else, a diluted white vinegar solution is another fantastic option I’ve used.
- White Vinegar Solution: Mix one part white vinegar with two parts water.
- Application: Use a clean cloth to gently dab the solution onto the stain.
- Patience is Key: Let it sit for about 15-20 minutesto work its magic before rinsing.
The most important thing here is patience and testing. I really can’t say this enough, and it’s a rule I live by for all my laundry projects!
Always test any cleaning solution on a hidden spot first, like an inside seam or hem. This simple check takes just a minute and ensures you’re protecting your favorite clothes while still tackling that pesky stain.
More Ideas You'll Love

Caring for delicate materials requires a bit more thought, but it’s completely doable. For more detailed instructions, you can check out my complete guide on how to wash silk to keep your favorite pieces looking their best.
What to Try on Stubborn, Set-In Stains
Sometimes, a stain just doesn’t want to budge. We’ve all been there. Maybe you didn’t notice the Sharpie mark until it was long past dry, or it’s on a synthetic fabric that seems to grab onto that ink for dear life. If the first round with rubbing alcohol didn’t quite do the trick, don’t throw in the towel just yet!
This is usually when I reach for a couple of other options from my cleaning arsenal. We just need to switch up our approach to break down what’s left of that pesky mark.

My Go-To Methods for Tough Stains
When a Sharpie stain has had time to really set in, you often need something with a little more oomph to lift the remaining pigment. I have two simple household remedies that have worked wonders for me in these exact situations.
- Toothpaste & Baking Soda Paste: This is a fantastic little trick! Just mix equal parts of a basic, non-gel white toothpaste and baking soda until you have a thick paste. Dab it right onto the stain and use an old toothbrush to gently work it into the fabric with small, circular motions. The paste is a mild abrasive that helps lift the ink right out of the fibers.
- Hand Sanitizer: This is one of my favorite hacks because it’s just so convenient. Hand sanitizer is basically rubbing alcohol in a thicker gel form, which is brilliant because it stays put on the stain instead of dripping everywhere. Just apply a good dollop, let it sit for several minutes, and then blot it away with a clean cloth.

After you’ve treated the spot with one of these methods, the next step is crucial. I always follow up by working a good, heavy-duty liquid laundry detergent directly into the area and letting it sit for about 15 minutes before tossing it in for a final wash.
These techniques are incredibly useful for all sorts of ink mishaps, not just permanent markers. For a deeper dive into tackling everything from ballpoint pens to printer ink, be sure to check out my other guide on how to remove ink stains from your clothes.
The Final Wash to Remove the Stain for Good
You’ve worked your magic on the stain and it looks like it’s almost gone. Hooray! But don’t get ahead of yourself—we’re not quite done yet. This last wash is what really finishes the job, getting rid of any sneaky leftover ink and all the cleaning stuff you used to treat it.
My go-to method is to wash the item all by itself. I use the warmest water that the fabric care tag says is okay, along with a high-quality laundry detergent to lift away those last stubborn traces.
If I’m dealing with a particularly nasty stain or a delicate fabric, I’ll often add a little extra security by dabbing my homemade laundry stain stick right onto the spot before tossing it in the machine.
Now, for the single most important rule of stain removal. I’m going to say it again because it’s that critical: DO NOT put the clothing in the dryer unless you are 100% certain every last bit of the stain has vanished!
The intense heat from a dryer will set any remaining ink right into the fabric fibers, basically making it permanent. Trust me, after all that effort, this is the one mistake you absolutely don’t want to make!
I always, always let the item air-dry completely after washing. This simple patience pays off, because it lets me give it a thorough inspection in good, natural light. If I spot even a faint shadow of the old stain, I can just repeat one of the treatments. It’s this careful final check that really saves your favorite clothes from a permanent ink disaster.

A Few More Sharpie Stain Questions Answered
I get asked about stubborn stains all the time, and how to get Sharpie out of clothes is always a hot topic! It’s one of those little household emergencies that feels like a total disaster in the moment. Here are the answers to a few questions I hear over and over, so you can feel ready to tackle these ink marks whenever they pop up.
Does This Work on Colored Sharpie Stains Too?
Yes, it absolutely does! While that classic black ink often looks like the most intimidating stain, these methods using alcohol-based solvents are fantastic at breaking down the pigments in all colors of Sharpie markers.
You might find you need a second pass for darker colors like blue or red, but the actual process is exactly the same. Just be patient and repeat if needed.
What If the Stain Has Been Through the Dryer?
Oh, that’s the tough one. When a stain goes through the dryer, the heat basically bakes it into the fabric, making it much harder to remove. But don’t lose all hope just yet!
I would still give the rubbing alcohol method a serious try. Just be prepared to let the alcohol soak for a bit longer, maybe 15 minutes, and plan on repeating the blotting process multiple times. Your chances are definitely lower, but I’ve seen it work with enough patience and persistence.
Can I Use These Tricks on My Couch or Carpet?
You can, but you have to be extremely careful here. For things like upholstery and carpet, I always recommend testing your chosen cleaner (like rubbing alcohol) on a hidden spot first. Find an area under a cushion or in a closet to make sure it doesn’t cause any color fading or damage.
Use that same dabbing method with a clean white cloth, and always work from the outside of the stain inward. This keeps the ink from spreading and creating an even bigger mess. Slow and steady wins the race with upholstery stains.
What’s your worst Sharpie mishap?