


Over the years I’ve gotten dozens of emails from readers complaining about unpleasant smells coming from their high-efficiency front-loading washing machines. I was more than willing to take a look into this issue, but I don’t actually own a front-loading washing machine! That makes it difficult to take my usual “hands-on” approach to finding solutions to these kinds of household issues. :-) So I did the only thing I could do – I scoured the internet for information! I read dozens of articles online about washing machine issues, until I had pretty good idea of what was causing those unpleasant washing machine smells.
Related: How to Clean Your Top-Loading Washing Machine
Since HE washers use less water and energy than standard washers, eventually detergent residue, dirt, mildew and minerals can build up inside the machine. This buildup often results in odors, and can even cause your clothes to come out of the wash in a less-than-clean state.
But luckily, there are a few easy steps you can take to help keep the inside of your washer clean and running right. And fortunately, the machine will do most of the work for you! (I wanted to quickly mention that a neighbor of mine was kind enough to offer to let me use her front-loading washing machine for the photos in this post. I don’t know what we would have done otherwise, so thanks Kimberli!) :-)
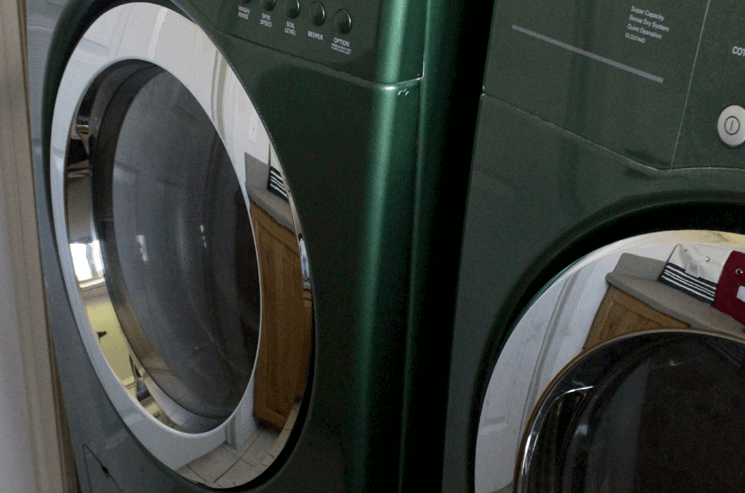
How to Deep Clean Your Front-Loading Washing Machine
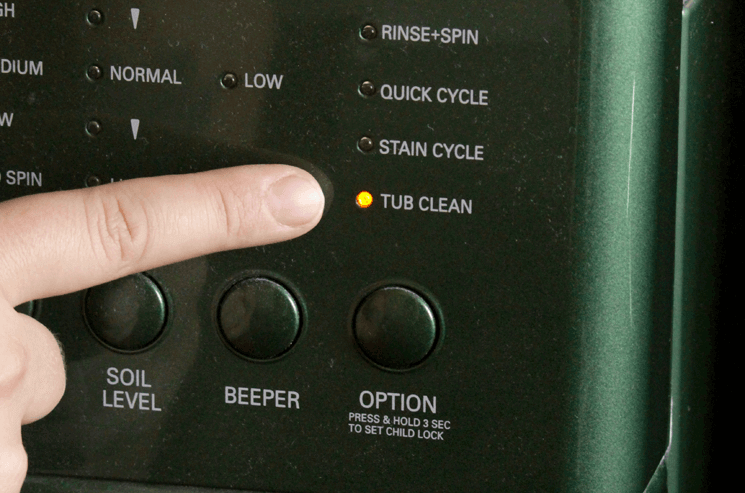
Step 1 – Run a Wash Cycle With 2 Cups Vinegar
Make sure the drum of your washer is empty, then select the “clean cycle” or “tub clean” setting on your washer.
(If your washer doesn’t have a cleaning cycle, just select the hottest and largest load settings.)
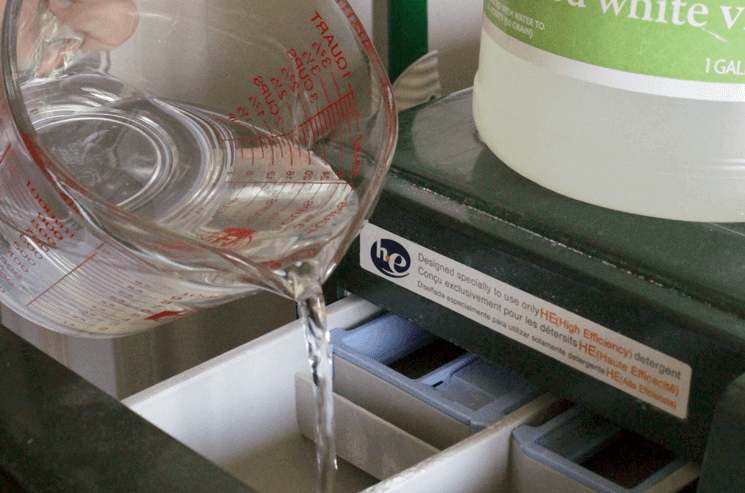
Add 2 cups of vinegar to the detergent tray, which will help get rid of odor-causing deposits and mildew.
Allow the washing machine to run through a complete wash and rinse cycle.
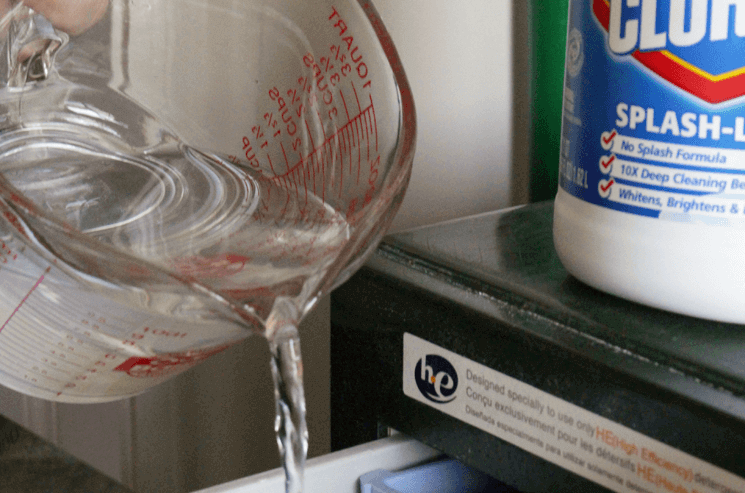
Step 2 – Run a Hot Wash Cycle With 2 Cups Bleach
Fill the washer a second time with hot water, also on the “clean cycle” setting (or the hottest, largest setting).
Add 2 cups of bleach to the detergent tray, to remove stains and germs that may be lurking in the wash tub. Again, allow the machine to run through a complete wash and rinse cycle.
Step 3 – Run an Additional Rinse Cycle
If all of the stains are removed, run an additional cycle without adding anything to the water. This will thoroughly rinse away any remaining residue.
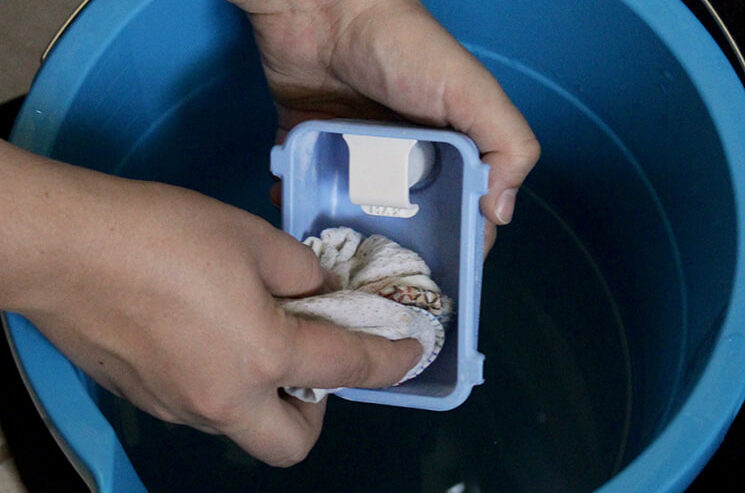
Step 4 – Clean the Detergent Tray
Remove the bleach dispenser, fabric softener dispenser, and any other removable parts from your washer’s detergent tray.
Fill a bucket with warm water and a few drops of dish soap. Drop the detergent tray pieces into the bucket and let them soak for a few minutes.
After soaking for a few minutes, pick the pieces out of the bucket and clean them thoroughly with a sponge or cleaning rag. Dry the parts and return them to their original position in your detergent tray.
More Ideas You'll Love


Step 5 – Clean the Door Seal and Machine Exterior
Next, pull back the rubber seal at around the washer door to inspect it for deposits, mildew, and other yucky stuff.
If it need to be cleaned, which it probably does, mix together 1 cup of liquid chlorine bleach and 1 gallon of warm water in a bucket. Moisten a clean cloth with the bleach water solution, then use the damp cloth to wipe down the seal.
After wiping the seal down with the bleach water cloth, follow with a clean, dry cloth to help remove any remaining moisture from the seal area.

Finally, use a damp cloth or an all-purpose cleaner to wipe down the outside of your machine to get it looking as clean outside as it is on the inside!
Just follow the 5 steps above, and your front-loading washing machine hould be in tip-top shape once again! And remember that this is a process you should be doing regularly – at least once per month.
Everyday Maintenance for Your Front-Loading Washer
In addition to a monthly deep cleaning, there are a few steps you can take on a day-to-day basis to help keep your washer clean in the long run. Do the following things each time you use your washing machine:
- After completing a wash cycle, take the clothes out of the washer as soon as you can.
- Leave the washer door ajar to let the door and drum dry between uses.
- Wipe down the rubber seal and drum with a cloth or paper towel.
- Pull the detergent tray out to let it dry.
These simple steps should keep your washer running efficiently and your clothes smelling fresh!
Do you love your front-load washing machine?
NEW! Can you guess the 5-letter word related to today’s post?
More Ideas You'll Love


I use a mix of roughly equal parts (maybe 1/8 cup each) washing soda, Borax, and unscented oxygen bleach to clean our front loader and it seems to work well. I do it maybe twice per year. And we leave the door open and wipe the gasket dry after every wash.
Please log in or create a free account to comment.I had odor in my Samsung washing machine. I was search on google for how to clear odor in our washing machine. Now I found this post. Is this post had very useful tips to clean washing machines. Thanks for the wonderful post. Further more details visit https://www.washingmachineservicecenters.in
Please log in or create a free account to comment.I run a short hot wash with a dishwasher puck (unwrapped solid ones,not the liquid ones) on a regular basis. Works well, no bleach smell, no excessive suds like you can get if you use a laundry puck.
Please log in or create a free account to comment.Thanks for the wonderful tips
Please log in or create a free account to comment.I’ve noticed too that when using bleach, spring for the good stuff. The stronger 6% works way, way better than the off brand 3.5%. Also, after wiping the seals with the bleach solution, give a wipe with plain water to rinse off some of the bleach. Bleach will eventually eat up the seals and cause them to break down and leak.
Please log in or create a free account to comment.Thank you so much for all of your advice! I’ve been following you for years and you’re my go to person when I look up anything!!
How do i clean all the lint out of my matching dryer. I clean the screen but I cant get the lint out of the great.
Please log in or create a free account to comment.A vacuum with a thin attachment works wonderfully! Otherwise, a duster can do a pretty good job :-)
Please log in or create a free account to comment.Jillee,
Thanks for the cleaning tips for the front-load washers. I wasn’t sure what would help with odors. I’m allergic to bleach, do you have another suggestion?
Please log in or create a free account to comment.Thanks. I have really enjoyed your website.
Hydrogen peroxide! :-)
Please log in or create a free account to comment.I will try this . Thank you for your help. I love the washer hate the smell.
Please log in or create a free account to comment.Thank you Jillee for all your advices in so many subjects. I always look forward to receiving them and follow. I will be doing this washing machine cleaning from now on. Many many thanks. and wish a wonderful Sunday and week ahead.
Please log in or create a free account to comment.Thanks! With the number of people living in my house, and thus the amount of laundry my poor machine sees. monthly cleanings are a great idea… one I’m kind of ashamed I didn’t think of myself. : ) Keep up the great posts, Jillee!!!
Please log in or create a free account to comment.P.S. I’m excited to try your breakfast quesadillas tomorrow morning!
Trying this out this weekend! Never realized how much more effort the front loading set would be…. thanks, Jillee!
Please log in or create a free account to comment.Very useful recommendations!
Please log in or create a free account to comment.This was simple, easy and effective. Thank you.
Please log in or create a free account to comment.Can you give sine advice on cleaning top loading washing machines? Thankyou!!
Please log in or create a free account to comment.Here you go: http://jillee.co/2ouTRAl
Please log in or create a free account to comment.If you’re feeling really lazy, you can run the detergent container parts through the dishwasher while you’re doing a vinegar cleaning of the dishwasher. Multitasking for the win.
Please log in or create a free account to comment.Dont forget, too, if you have a filter that will need cleaning out monthly. It collects coins and bobby pins that get left in pockets. It can get really smelly in there if you leave it too long
Please log in or create a free account to comment.Where would said filter be if I have one?
Please log in or create a free account to comment.My filter is on the bottom in the front. I empty it every other month, it’s like a lint trap for the washer.
Just be sure to tighten the filter back up!!! I didn’t do that ONCE, and while I was cleaning other parts of the house, the washer kept running. It flooded my laundry room, went into the hallway, and eventually down to my garage. It was a nightmare to clean up. Luckily i was already using my carpet cleaner.
I looked at my washer manual for how to clean the filter. My suggests that we do it after every load (seems super often) but I have begun to make it part of my weekly chores, usually right after I finish the laundry for the week. I do all my laundry usually on Sunday and making this part of “doing laundry” ensures that things don’t get backed up in there. My daughter always forgets at least 1-2 bobby pins in her pockets. They can be hard to see of feel when sorting.
I was wondering the same thing!!!!
For those of you with pets-and I foster dogs, so consequently do a lot of laundry- shake out those towels and blankets and washable dog beds before washing. But you will still have a lot of pet hair that accumulates in that rubber seal. I make sure I wipe it out between every load. Otherwise: yuck!
Please log in or create a free account to comment.I pull the detergent cup and everything else out of that little drawer, and put it all in my dishwasher, top rack. It’s much more efficient than cleaning by hand, with the added benefit of not having to clean it by hand! :-) Also, your washer (whether front or top loading) will stink up much more quickly if you’re using liquid fabric softener or dryer sheets. Both products are laden with fats and chemicals that are not only toxic to us humans, but which add to the gunky build-up in both your washer and dryer. There are alternatives to commercial fabric softeners which are natural and safe. Try a half a cup of vinegar in the final rinse, that pretty much eliminates static. If your laundry is full of clothing with artificial fibres, you will have much more static than if you wear cotton, etc. Dryer balls, either commercial or the felted ones, are a good alternative. So is hanging out your laundry, if you can (and that really saves money, too!). I have an indoor drying rack which I place over the living room floor duct in the winter, and an entire load of laundry will dry in two to three hours. Plus, in the winter, you have the added benefit of that moisture in your home, making it feel warmer without raising the thermostat.
Please log in or create a free account to comment.Sometimes the water hose going into wall can be filled with gunk and smell. The hose should only be push in certain amount. If it is deep inside the u-shaped drain where water sits, it can create a place for mold to form. My laundry smelled like a sewer when the washing machine was running. After trying many different methods of cleaning the machine, my solution turned out be just pull the hose out, clean it and insert it to a lesser depth.
Please log in or create a free account to comment.I have thoroughly enjoyed your column and emails. Have gotten some great tips – thank you.
I’m wondering if there is a way for you to add a function to your website to make it easier to print out these great ideas? To print out these steps would be about 9/10 pages. Can you not put together a “condensed” version that would come under a “print” icon?
Thanks you.
Please log in or create a free account to comment.There is a green print button at the bottom of the post that does just that! :-)
Please log in or create a free account to comment.When I print, I take out all the pictures. Then I only have a few pages and info I need.
Please log in or create a free account to comment.I am allergic to bleach and keep searching for a way to keep our front loading washer clean. Vinegar and baking soda aren’t cutting it. Any suggestions for cleaning that does not involve bleach?
Please log in or create a free account to comment.Hydrogen Peroxide :-)
Please log in or create a free account to comment.Try using an old soft toothbrush on the curled up edges of the seal closest to the drum – works way better and faster than a sponge or cleaning cloth!
Doing the vinegar/bleach routine once a month seems way too frequent – it depends on how many loads you do per week and the quality of your water.
Please log in or create a free account to comment.My manufacturer recommends every 30 loads which is a much longer period of time than I think it will be considering how many loads I think I do!
Please log in or create a free account to comment.I never never had a bad smell in my front-loading washing machine, and I’ve had one for more than 20 years. But then, I always leave the door open between washes.
Please log in or create a free account to comment.You are exactly right. I leave mine front loading washer door open overnight after doing my laundry and I never have a problem with unpleasant odors. Occasionally someone who doesn’t know any better will come along and close my washer door for me and it will get smelly, so I just run a load of Clorox or vinegar and baking soda through it and the odor is gone.
Please log in or create a free account to comment.I use approx one table spoon of Bicarbonate soda with detergent with every wash.
Please log in or create a free account to comment.Also to clean the detergent tray I found most efective is kettle and steam iron cleaner. Soak it in mixure of water and cleaner solution until the scale is off.
That’s brilliant, thank you. I’ve been using front loading washing machines for about 40 years now and only recently, for the first time, have I noticed a very unpleasant smell every time I open the door and for the life of me, I didn’t have a clue how to get rid of it. So thanks once again
Please log in or create a free account to comment.To prevent the smell from returning plus give your detergent a boost, use a scoop of borax with every load.
Please log in or create a free account to comment.