0 Comments
Wondering how to clean hardwood floors? The best way to keep hardwood floors looking their best is surprisingly simple. It’s a two-part dance: first, get rid of all the loose stuff with a soft broom or vacuum (turn that beater bar off!), and then follow up with a damp microfiber mop. The key is using a pH-neutral cleaner made specifically for wood. This approach stops grit from scratching the surface and protects that delicate finish from water damage and harsh chemicals.
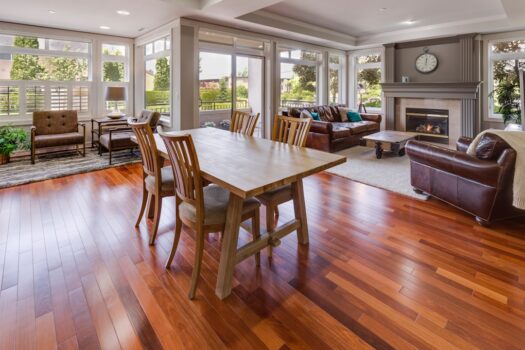
Your Guide to Flawless Hardwood Floors
Knowing how to properly clean hardwood is less about elbow grease and more about consistent, gentle care. You’re trying to protect a major investment in your home, and that starts with steering clear of the common mistakes that can slowly eat away at the finish. I’ve seen countless homeowners cause damage with the best of intentions.
A classic example is the old vinegar and water trick. It’s a popular DIY tip, but vinegar is acidic. Over time, that acidity can dull and even begin to strip the protective polyurethane sealant right off your floors. Another common misstep? Using a sopping wet mop. All that excess water seeps into the seams between the boards, which can lead to swelling, cupping, and irreversible damage down the road.

The Foundation of a Good Clean
The most effective cleaning strategy always starts with getting the abrasive particles off the floor. Sweeping or vacuuming daily isn’t just about keeping things tidy; it’s about preventing tiny bits of sand and dirt from acting like sandpaper under your family’s feet, scratching the surface with every step.
Key Takeaway: The secret isn’t just cleaning; it’s preserving. Using a pH-neutral, wood-specific cleaner ensures you’re lifting the grime without harming the floor’s essential protective layer.
This guide will break it all down for you, offering a clear roadmap for both daily upkeep and those occasional deeper cleans. We’ll focus on what actually works to keep your floors beautiful for years, starting with a simple cheat sheet.

Your Hardwood Floor Cleaning Cheat Sheet
To make things easy, I’ve put together this quick-reference table. Think of it as your go-to guide for making the right choices every day and every week.
| Cleaning Task | What You Should Do (The Right Way) | What to Avoid (Common Mistakes) |
|---|---|---|
| Daily Debris Removal | Use a soft-bristle broom or a vacuum with the beater bar turned off. A dry microfiber dust mop is also great. | Using a stiff-bristled broom that can scratch the finish. Forgetting to turn off the vacuum’s beater bar. |
| Weekly Mopping | Lightly mist a microfiber mop pad with a pH-neutral wood floor cleaner. The pad should be damp, never wet. | Soaking the floor with a string mop. Using vinegar, ammonia, or all-purpose cleaners that can dull the finish. |
| Spill Cleanup | Wipe up spills immediately with a soft, dry cloth. For sticky spots, use a cloth slightly dampened with your wood cleaner. | Letting spills sit, especially liquids. Scrubbing aggressively with an abrasive sponge. |
Stick to the “right way” column, and you’ll avoid the most common (and costly) hardwood maintenance mistakes I see.
Building Your Hardwood Cleaning Toolkit
Before you can even think about mopping, you need to have the right gear. Trust me, using the wrong tools on your hardwood can be just as bad as using a harsh cleaner, turning a simple cleanup into a costly mistake. Think of it as investing in your floor’s future—a little thought now prevents a lot of headaches later.
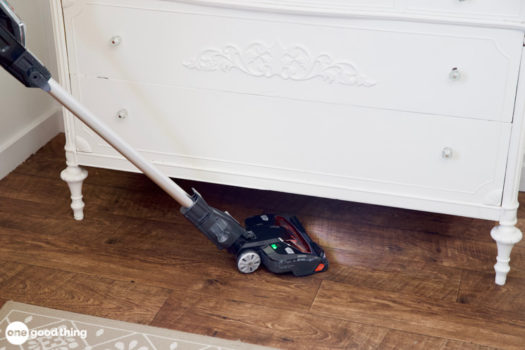
For the daily battle against dust and pet hair, your go-to should be a microfiber or electrostatic dust mop. These things are magic. They grab onto all those fine particles without just pushing them around and, more importantly, without scratching your floor’s finish. This isn’t a step you want to skip before you bring any moisture into the equation.
A good vacuum with a soft brush attachment is also a solid choice, especially for getting into those tricky corners and along the baseboards. The one non-negotiable rule here? Make absolutely sure the beater bar—that stiff, spinning brush—is turned off. It’s designed to rough up carpets, and it will do a number on your wood floors by creating tiny little scratches over time.
Essentials for a Deeper Clean

When it’s time to deal with footprints and spills, a flat-head microfiber mop is the only way to go. Its design is perfect for hardwood because it lets you clean with a minimal amount of water, which is crucial. Old-school string mops are a disaster waiting to happen; they hold way too much liquid and can easily leave puddles that lead to warping and damage.
Microfiber is just better all around. It’s incredibly absorbent and does a fantastic job of lifting grime, making it the safest, most effective choice for wood. You can learn more about the benefits of using microfiber for household tasks to really get the most out of your tools.
Pro Tip: Wring out your microfiber mop pad until it’s just barely damp to the touch. If you can squeeze a single drop of water out of it, it’s still too wet for your hardwood floors.
More Ideas You'll Love

Finally, let’s talk about the cleaner itself. You absolutely must use a pH-neutral cleaner that is specifically made for hardwood. Steer clear of all-purpose cleaners! They’re often too acidic or alkaline and can slowly strip away your floor’s protective finish. Read the label carefully—the right product is what keeps that beautiful glow alive.
A Practical Guide to Deep Cleaning Your Floors
Deep cleaning your hardwood floors is about more than just mopping. It’s about bringing back their original shine and tackling the deep-down grime that a quick daily sweep just can’t handle. When you do it right, your floors will look completely refreshed without a hint of damage.
Before a single drop of cleaner hits the wood, you’ve got to prep the room. This is the most important part of the whole process. Get all the furniture out of the way. I always use felt furniture sliders for the heavy stuff like my sofa or bookshelves—it saves the floor from any accidental scratches.
Once the room is empty, you need to do a serious dry clean. I start with a vacuum, using the soft brush attachment to get right into the corners and along the baseboards. Then, I go over everything again with a dry microfiber dust mop to catch any super-fine dust the vacuum missed. The goal here is to get 100% of the gritty dirt up before you introduce any moisture.

The Right Mopping Technique
The real secret to a perfect deep clean comes down to the mopping itself, and it’s all about control. Ditch those old-school string mops that just dump buckets of water everywhere. A flat-head microfiber mop is your best friend for this job. You want the mop pad to be damp, not wet. A good way to check is to wring it out until you literally can’t squeeze another drop of water from it.
I always work in small, manageable sections, usually about 4×4 feet at a time. This keeps the cleaning solution from drying on the floor before you’ve had a chance to work it in and buff the area.
This simple infographic really nails the basic process.

As you can see, it’s a simple flow: dry, damp, then dry again. The key is making sure no moisture is left hanging around.
When I mop, I use a gentle “S” pattern and always move with the grain of the wood. It’s a technique that seems to lift dirt really effectively and helps avoid streaks. If you ever do end up with a cloudy look after you’re done, you can learn how to remove hazy residue from hardwood floors pretty easily.
The Final Buff for a Perfect Finish
This last touch is what really gives you that satisfying, streak-free glow. Right after mopping a section, immediately go over it with a separate, totally clean and dry microfiber cloth. You can either get down on your hands and knees or just attach a dry pad to your mop.
More Ideas You'll Love

Key Takeaway: Buffing the floor dry whisks away any leftover moisture, stops water spots from forming, and gives the surface a beautiful polish. This is the step that separates a pretty good clean from a truly great one.
This quick buffing step is your insurance policy. It makes sure no water has time to sneak into the seams between floorboards, protecting your investment and leaving behind nothing but a beautifully clean floor you can be proud of.

How to Handle Spills, Scuffs, and Sticky Spots
Even with the most careful routine, life happens. Spills, scuffs, and sticky messes are just an inevitable part of living on hardwood floors. The real trick isn’t trying to prevent them entirely—it’s knowing exactly how to react when they pop up so you can stop lasting damage in its tracks.
The absolute number one rule for any liquid spill—whether it’s water, juice, or a pet accident—is to act immediately. Grab a clean, soft cloth and blot the spill right away. Always work from the outside of the spill inward to keep from spreading it. Never, ever let moisture sit on your floors, as it can seep between the boards and cause ugly warping or discoloration.

Removing Scuffs and Sticky Residue
For those annoying black scuff marks that shoes love to leave behind, you don’t need a special cleaner. A simple tennis ball or microfiber cloth actually works wonders. Just rub it gently over the scuff, and it will lift the mark without scratching the finish. For smaller marks, a standard pencil eraser can work in a pinch.
Tackling sticky spots from tape, spilled soda, or food requires a bit more care. Here’s a safe method I always recommend:
- First, dampen a soft cloth with warm water and just a drop of your go-to pH-neutral wood floor cleaner.
- Next, lay that damp cloth over the sticky area for a few minutes. This helps soften up the residue.
- Gently wipe the spot away, making sure you move with the grain of the wood.
- Finally, wipe the area with a clean, dry cloth to get rid of any lingering moisture.
Key Insight: The goal is always to start with the gentlest method first. Jumping to aggressive scrubbing or harsh chemicals can permanently damage your floor’s protective finish, turning a minor spot into a major—and expensive—repair.
Common Mistakes That Can Ruin Hardwood Floors
When it comes to keeping hardwood floors looking their best, knowing what not to do is just as important as knowing what to do. So many well-intentioned cleaning habits can cause slow, steady damage that you won’t notice until it’s too late—and the repair bill is huge.
The biggest, most destructive mistake I see people make is using way too much water.
When you slosh a sopping wet mop around, all that excess water inevitably seeps into the seams between the boards. The wood fibers soak it right up and begin to swell, which leads to that ugly cupped or warped look. This can permanently damage both the wood and its finish.

The Problem With DIY Cleaners And Steam Mops
Another habit that makes me cringe is using DIY cleaners made with vinegar or ammonia. I get the appeal—they seem like effective, natural options, and you know how much I love vinegar for cleaning —but their acidity is a real problem for hardwood. Over time, these acidic solutions slowly eat away at the protective polyurethane finish, leaving your beautiful wood vulnerable to scratches, dulling, and water damage.
Key Takeaway: A floor with a compromised finish gets dirty faster and is much harder to clean, creating a frustrating cycle. Stick to pH-neutral cleaners specifically designed to protect your floor’s sealant. If you ARE going to use vinegar on wood, make sure you know the nuances first!
And then there are steam mops. These are a major no-go for hardwood. They work by injecting hot, pressurized moisture deep into the wood’s pores and between the planks. This causes the same swelling and warping as a wet mop, but the heat and pressure make the damage happen much, much faster. Using a steam mop will even void the warranty on many types of flooring! Before you even think about it, it’s worth reading up on the most common steam mop mistakes that can ruin your flooring.
Finally, please, never use abrasive tools like steel wool or scouring pads on your hardwood. They will absolutely scratch and scuff the finish, creating permanent dull spots that can only be fixed by refinishing the entire floor.
Even after you get the basics down, a few questions always seem to pop up when it comes to cleaning hardwood floors. It’s completely normal! I get asked these all the time, so let’s clear up a few of the big ones so you can clean with total confidence.
Frequently Asked Questions
How Often Should I Really Be Deep Cleaning My Hardwood Floors?
For most of us, giving your floors a really good, deep clean every 1-2 months is plenty. Now, if you’ve got a busy house—I’m talking kids, pets, the whole nine yards—you might find yourself needing to do it a bit more often, maybe every 4-6 weeks. This is especially true for those high-traffic spots like the kitchen and entryway that seem to get all the action.
Honestly, though, the secret isn’t in how often you mop. It’s all about consistent daily care. A quick daily sweep or vacuum makes a much bigger difference in preventing scratches from grit and dirt than any deep cleaning schedule ever will.
Can I Just Use a Steam Mop on My Sealed Hardwood?
Please don’t! This is one of the absolute worst things you can do to your wood floors. Steam mops are designed to force hot, pressurized moisture into surfaces, and when you do that to wood, it’s a recipe for disaster.
That steam gets pushed between the floorboards and deep into the wood itself. This can quickly lead to permanent damage like warping, cupping (when the edges of the boards are higher than the center), and peeling finishes. In fact, most hardwood flooring warranties are immediately voided if you use a steam mop. Just stick with a slightly damp microfiber mop—it’s all you need.
Is That DIY Vinegar and Water Solution Really That Bad?
I know it’s a popular “hack” you see everywhere, but yes, using vinegar on your hardwood is a bad idea over the long haul.
Vinegar is an acid, plain and simple. Over time, it will slowly but surely eat away at the protective polyurethane finish on your floors. At first, you might not notice, but eventually, your floors will start to look dull and become much more vulnerable to scratches and water spots.
While it seems like a cheap and natural option, you’re actually compromising the single most important protective layer on your flooring. It’s always a better—and safer—bet to use a pH-neutral cleaner that was made specifically for wood.
What’s your best tip for keeping wood floors looking great?