0 Comments

Just thinking about how to organize kitchen cabinets used to make my head spin! Tackling your kitchen cabinets can feel like a massive chore, right? One day they’re reasonably tidy, and the next, an avalanche of mismatched container lids and ancient spices comes tumbling out. If you’re feeling overwhelmed just thinking about it, trust me, you are not alone! Kitchen cabinets are one of the most common clutter hotspots in any home.
But we’re going to walk through this together. The goal isn’t just to make things look nice for a day; it’s about creating a simple, logical system that actually works for you and your family long-term. Let’s make this project feel manageable and, dare I say, maybe even a little bit fun.
Your Simple Roadmap to Calm Kitchen Cabinets
The secret to lasting kitchen cabinet organization boils down to a simple, repeatable process:
- empty everything out
- declutter ruthlessly
- group similar items
- put everything back in a way that makes sense for your daily life
It’s a straightforward method that creates order out of chaos and makes your kitchen so much easier and more enjoyable to use.
The Basic Steps to Success
The core idea here is to break this big project down into smaller, logical phases so you don’t get stuck halfway through. We’ll start by taking everything out—yes, everything!—and giving those shelves a good, satisfying scrub.
Then comes the best part: decluttering. We’ll sort it all into ‘keep,’ ‘donate,’ and ‘toss’ piles. After that, I’ll show you my favorite trick for grouping items by how you actually use them (like putting all your baking supplies in one spot). Finally, we’ll strategically place it all back inside.

This visual guide breaks down the basic flow of the project beautifully.
Here is a quick summary of the core steps to take back control of your kitchen cabinets.
My 4-Step Cabinet Organization Plan
| Step | What to Do | Why It Works |
|---|---|---|
| 1. Empty | Take every single item out of your cabinets. | Forces you to see exactly what you have and gives you a clean slate. |
| 2. Declutter | Sort items into “keep,” “donate,” or “toss” piles. Be honest! | Removes expired, broken, or unused items that are just taking up space. |
| 3. Group | Put similar items together (e.g., all baking supplies, all coffee mugs). | Makes it easy to find what you need and see inventory at a glance. |
| 4. Arrange | Place items back in cabinets based on frequency of use. | Puts your most-used items in the most accessible spots, saving you time every day. |
Seeing the process laid out this way shows just how simple it can be when you focus on one stage at a time. It’s a simple process that will bring lasting order to your kitchen. I’ve shared some of my favorite tips for an organized kitchen before, and this method is the foundation for all of them.
My biggest piece of advice? Don’t try to do it all at once if you’re short on time. Tackle one cabinet or one drawer at a time. Slow progress is still progress!

The Great Cabinet Cleanout: Deciding What Stays and What Goes
Alright, take a deep breath. This is where the real magic begins! Pulling every single thing out of your cabinets can feel a bit chaotic, I know, but trust me on this—it’s the most important part of the whole process. It’s the only way you can truly see what you’re working with and finally figure out what’s been hiding in those back corners for years.
As you empty each cabinet one by one, set up three distinct zones on your counter or floor. I usually just use laundry baskets or whatever empty boxes I have lying around. This simple sorting system makes the decision-making part so much smoother.

Your Three Sorting Piles
Ready to sort? Here are the categories that will make your life easier:
- The Keep Pile: These are the items you love and use all the time. Don’t overthink it. If it’s your go-to coffee mug or your favorite mixing bowl, it’s a definite keeper.
- The Donate Pile: This is for anything that’s still in good shape but you just don’t use. You know what I’m talking about—that extra set of dishes you got as a wedding gift, the bread maker you used once, or that collection of 20 identical plastic cups from various events.
- The Toss Pile: This pile is for anything that’s broken, chipped, expired, or just plain worn out. Be ruthless here! That lid with no matching container? Toss it. Spices from five years ago? Gone.
You’ll probably notice that a fourth category starts to emerge all on its own: the “kitchen imposters.” These are the things that have somehow migrated into your kitchen but don’t really belong there—stray batteries, pens, rubber bands, you name it. It’s amazing how these little things contribute to that constant feeling of messiness. You can learn more about the usual suspects and things that contribute to kitchen clutter to help you spot them more easily.
More Ideas You'll Love

The goal isn’t just about throwing things away; it’s about making intentional choices. Ask yourself, “Do I use this? Do I love this? Does this make my life easier?” If the answer isn’t a clear “yes,” it’s probably time to let it go.
This process of deciding what to keep is where you truly reclaim your space. You’re not just cleaning out cabinets; you’re curating a kitchen that actually serves you and your family. Freeing up that prime cabinet real estate from things you don’t need makes all the difference and clears the way for a system that actually works.
Creating Smart Zones for Everyday Harmony
Okay, you’ve sorted through everything and know exactly what you’re keeping. Now we get to the really fun part! This is where you get to customize your kitchen to fit your life. We’re going to group all those “keep” items together into logical categories, or what I like to call “smart zones.”
Think of it like setting up little stations all around your kitchen, each with its own purpose. This simple act of grouping transforms your cabinets from random storage spaces into a logical, easy-to-use system that makes your daily routine so much smoother.

How to Create Your Kitchen Zones
The best way to figure out your zones is to simply think about your daily habits. Where do you make coffee? Where do you chop vegetables? The whole point is to store things right where you actually use them.
Here are a few popular ways to group your stuff:
- By Function: This is my absolute favorite method! Create a baking zone with flour, sugar, mixing bowls, and cookie sheets all together. You could also set up a prep zone near your main countertop with cutting boards, knives, and mixing bowls.
- By Frequency of Use: Keep your everyday plates, bowls, and glasses front and center in a cabinet that’s super easy to reach. Holiday platters or that fondue pot you use once a year can go on the highest shelves, out of the way.
- By Meal Type: This is a brilliant trick if you have kids! You can create a breakfast bin with oatmeal packets, honey, and spoons. Or how about a dedicated “pasta night” basket with pasta, jars of sauce, and a colander?
For example, I keep all my coffee and tea supplies in the cabinet directly above my coffee maker. Mugs, filters, coffee beans, sugar—the whole shebang is right there. It saves me so much time and hassle during my busy morning routine!
A well-zoned kitchen means you’re not zig-zagging from one side to the other just to make a sandwich. Everything you need is exactly where you expect it to be, which brings a wonderful sense of calm to a busy space.

Ideas for Practical Kitchen Zones
To get you started, think about which of these zones would make the biggest difference in your own kitchen. You definitely don’t have to create all of them—just pick the ones that fit your lifestyle. I’ve written before about using “urgency zones” to organize an entire home, and the same idea works perfectly in the kitchen.
Consider setting up a few of these handy stations:
More Ideas You'll Love

- Coffee & Tea Station: Mugs, coffee maker, coffee, filters, tea bags, and sugar.
- Everyday Dishes & Utensils: Plates, bowls, and silverware stored near the dishwasher to make unloading a breeze.
- Cooking & Prep Zone: Spices, oils, cutting boards, and mixing bowls near the stove.
- Baking Center: Flour, sugar, baking soda, vanilla, cookie sheets, and cake pans.
- Kids’ Snack Station: A low cabinet or drawer with healthy, grab-and-go snacks and drinks they can reach themselves.
- Food Storage Area: All your food storage containers and lids in one dedicated spot. No more searching!
Once you have your items grouped into these logical little families, you’ll be ready to put everything back in a way that truly works for you.

Putting Everything Back with a Purpose
Okay, all the hard work of sorting is behind us. Now for the fun part! This is where your vision for a beautifully organized kitchen starts to come to life. We’re going to put everything back, but this time, with a real strategy. This isn’t about just cramming things in wherever they fit; it’s about thoughtful placement that makes your everyday life so much easier.
The golden rule here is pretty simple: keep your most-used items in the most accessible spots.
In the organizing world, we call this “prime real estate”—the shelves right at eye level and the lower cabinets you can reach without grabbing a stool. Think about the things you grab multiple times a day. Your favorite coffee mugs, everyday plates, the kids’ snack bowls—these deserve the best spots in the house!
Arranging Items for Maximum Efficiency
So, where should everything actually go? The secret to a system that sticks is matching an item’s location to where you’ll be using it. It sounds like common sense, but this one little shift will completely change how your kitchen functions.
A few simple placement strategies can make a world of difference:
- Dishes and Glassware: Store plates, bowls, and glasses in a cabinet right next to the dishwasher or sink. This makes unloading a breeze because you won’t have to trek across the kitchen with a wobbly stack of plates.
- Pots and Pans: These belong near the stove. I always keep heavy items like my Dutch oven or large stockpots in lower cabinets. Trust me, you don’t want to be lifting those overhead.
- Spices and Oils: These should also live near the stove or your main food prep area. You’ll be so grateful everything is within arm’s reach when you’re in the middle of cooking.
- Food Storage Containers: Give all your containers and their lids a dedicated home, whether it’s one drawer or a single cabinet. No more frantic searching!
My best advice is to think of your kitchen layout in terms of motion. You want to minimize the steps you take to do anything, whether it’s making your morning coffee or packing lunches. Smart placement makes that possible.

Maximizing Every Inch of Space
Even with a great plan, some cabinets are just plain awkward, especially those deep or extra-tall ones. This is where you get to be clever and make sure no space goes to waste. The trick is to think vertically!
Vertical space is your secret weapon when learning how to organize kitchen cabinets effectively. Don’t just place items on the shelf; find ways to stack them up.
Here are some of my go-to solutions:
- Stackable Shelves (or Risers): These little wire shelves are fantastic. They instantly double your storage for things like mugs, bowls, and plates.
- Vertical Dividers: Use simple tension rods or tray dividers to store things like baking sheets, cutting boards, and muffin tins on their sides. It’s like a little filing cabinet, making it so easy to grab the one you need without unstacking the whole pile.
- Heavy Items on the Bottom: Always, always put your heaviest appliances—like your stand mixer or big pots—in the lowest cabinets. It’s safer and just plain easier.
And what about those high, hard-to-reach shelves you usually ignore? They’re now perfect for the things you only use a few times a year. Your holiday-themed serving platter or the big turkey roasting pan can live up there, out of sight but there when you need them.

My Favorite Budget-Friendly Cabinet Organizers
You absolutely do not need to spend a fortune to get beautifully organized kitchen cabinets! Over the years, I’ve discovered so many clever and inexpensive ways to tame the clutter without having to buy fancy, custom systems. It’s really all about finding simple tools that work hard for you.
There certainly are a lot of products out there to choose from! But when you look closer, many of the most helpful organizers are affordable plastic bins and simple containers. That just proves you don’t need to get fancy to be effective.
Honestly, many of my go-to solutions are things you can find at the dollar store or might even have lying around the house already. Let’s look at a few simple tools that can transform a messy cabinet into a masterpiece of organization.

Simple Tools for Big Impact
You would be amazed at what a few smart additions can do. These aren’t complicated systems; they’re just practical items that solve those common, everyday kitchen frustrations.
Here are a few of my tried-and-true favorites:
- Tension Rods: These are my secret weapon! I turn them vertically inside a cabinet to create instant dividers. They’re perfect for “filing” things like cutting boards, baking sheets, and platters. No more noisy unstacking!
- Simple Baskets: I grab these from the dollar store all the time. They are absolutely perfect for corralling loose items like spice packets, gelatin boxes, and all those little snack bags that seem to multiply on their own.
- Lazy Susans: That awkward corner cabinet doesn’t have to be a black hole where items go to disappear forever. A simple lazy Susan turntable makes everything in the back instantly accessible with just a quick spin.
- Drawer Dividers: Don’t limit these to your utensil drawer! Adjustable dividers are fantastic for organizing spices laid flat, rows of tea bags, or even those small, pesky kitchen gadgets.
A lot of these ideas are inspired by broader clever storage solutions for small spaces, which are all about maximizing every single inch you have.

Repurpose What You Already Have
Before you even think about heading to the store, take a look around your own home. You might be surprised by what you can repurpose into a brilliant organizer. You just have to think outside the box!
An old magazine file holder can be turned on its side to hold water bottles. A simple shoebox can become the perfect home for loose seasoning packets. I’ve even cleaned out empty glass jars from pasta sauce to store bulk items like rice or beans—it keeps them fresh and looks so tidy.
The best organization system is one you can actually afford and maintain. You don’t need a picture-perfect pantry from a magazine; you just need a system that makes your life easier every single day.
It’s all about finding what works for you and your budget. To help you get started without breaking the bank, I’ve shared even more of my favorite tricks, including a list of 15 amazing organizers you can find for under $10. A little creativity goes a long, long way.
Keeping Your Cabinets Tidy for Good
You’ve done all the hard work, and your kitchen cabinets look absolutely amazing! So, how do we keep them that way? The secret isn’t another huge overhaul; it’s all about building a few simple, tiny habits into your everyday routine.
A well-organized kitchen isn’t a one-time project. It’s an ongoing process, but I promise it doesn’t have to be a grind. With a few maintenance tricks up your sleeve, you can enjoy that wonderful feeling of peace and efficiency every single day.

Adopt the One-In, One-Out Rule
One of the best ways I’ve found to prevent new clutter from ever taking over is to live by my simple “one-in, one-out” rule. It’s just as straightforward as it sounds! Every time you bring a new item into the kitchen—whether it’s a new coffee mug or another bottle of olive oil—an old one has to go.
This little practice forces you to be mindful of what you’re accumulating. It’s a fantastic guard against duplicates and keeps your inventory in check, ensuring your beautifully organized cabinets don’t get overstuffed again.
The 5-Minute Weekly Tidy-Up
Another lifesaver is the quick weekly reset. You don’t need to spend hours on this—I’m talking five minutes once a week. That’s all it takes.
- Quickly scan your shelves for anything that has migrated to the wrong spot.
- Wipe up any crumbs or spills you see.
- Straighten up any containers or stacks that have gotten a bit messy.
This isn’t about deep cleaning or reorganizing. It’s just a quick touch-up that nips clutter in the bud before it has a chance to get out of control. It’s a tiny investment of time that pays off big!

Get the Whole Family on Board
Your system will only work if everyone in the house is on the same page. This is where clear communication—and maybe a few labels—can be a huge help! When everyone knows exactly where the snack bowls or the food storage containers go, they are much more likely to put them back correctly.
Making it a team effort turns a chore into a shared responsibility. Weaving these small tasks into your family’s routine is key, and using something like a daily and weekly chore tracker can make it easy for everyone to stay accountable. It’s these small, consistent efforts that make all the difference in the long run.
Common Questions About Kitchen Organization
Over the years, I’ve gotten so many questions about kitchen cabinet organization, and a few pop up again and again. Here are some quick answers to help you on your journey to a more peaceful and functional kitchen!
What’s the best way to handle deep cabinets?

Ugh, deep cabinets can be so tricky! My go-to solutions are either pull-out shelves or simple turntables (Lazy Susans). These genius little helpers bring everything from the back right to the front, so nothing gets lost in those dark, mysterious corners.
Baskets also work wonders in deep cabinets, especially for grouping things like bags of pasta, chips, or extra snacks.
How do I store pots, pans, and all those lids?
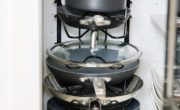
For those heavy pots and pans, a lower cabinet near the stove is always your best bet. It just makes life easier when you’re cooking up a storm.
Now, for the lids—the true troublemakers! I absolutely love using a simple vertical rack mounted right on the inside of the cabinet door. You can also get creative and use a tension rod to create a simple divider, letting you file the lids upright like records. It’s a game-changer!
What part of your kitchen is hardest to keep organized?