


It sounds like many of us could use a little reminder about the importance of cleaning our makeup brushes regularly! This is according to the results of a 2015 poll where 39% of women reported cleaning their makeup brushes less than once a month, while another 22% said they didn’t clean clean theirs at all!
While cleaning your makeup brushes one by one might sound like a tricky or time-consuming process, it doesn’t have to be! In fact, today I’ll be sharing two simple and effective methods for how to clean your makeup brushes and makeup sponges.
But before we get to that, let’s quickly refresh our understanding of exactly why it’s so important to clean our makeup brushes regularly!

Why It’s Important To Clean Your Makeup Brushes
The main reason it’s so important to clean your brushes is hygiene. Dirty makeup brushes are loaded with oily makeup products, dead skin cells, and bacteria, which is not a good combination for something that regularly comes into contact with your face!
In addition to the hygiene factor, clean makeup brushes are also better for application. Applying and blending your makeup to perfection is much easier with a clean brush! Using a dirty brush can lead to spotty coverage and other issues.

What To Use To Clean Your Makeup Brushes
There are several different cleansers you can choose from to wash your makeup brushes. Some manufacturers offer a special makeup brush cleaner for their brushes, which is supposed to help extend their lifespan. Brush cleanser can be a bit expensive, but there’s no reason not to use one if you already have it!
I personally prefer to use Dawn dish soap when cleaning makeup brushes, because the grease-cutting formula makes short work of all the oily makeup residue and bacteria trapped in the bristles. (I prefer Dawn just because that’s what I always use around the house, but any brand of dish soap will do!)
You could even use a gentle soap like Cetaphil or even baby shampoo, but I’d only recommend them if your brushes are pretty clean to begin with. These gentler options won’t be able to dissolve oily makeup nearly as effectively as dish soap (but they’ll certainly work better than nothing!)
What you shouldn’t use to clean your makeup brushes are vinegar or oil. The acid in vinegar is too harsh for delicate brushes, and although it does have the benefit of killing bacteria, dish soap gets rid of bacteria without being overly acidic. And while some people may clean their makeup brushes with a combination of dish soap and olive oil, the oil just isn’t necessary (and it can even worsen residue so it attracts more dirt and bacteria!)
How To Clean Makeup Brushes

You’ll need:
- Dish soap or other brush cleanser (see above)
- Silicone trivet (optional)
- Clean towel
Directions:

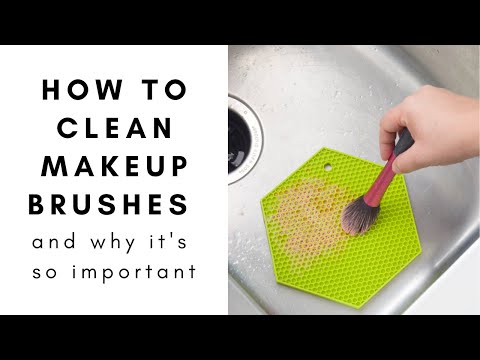
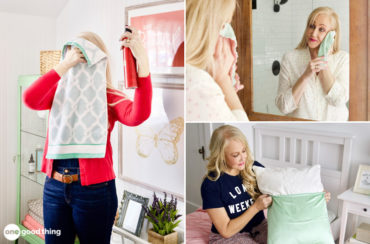
Step 1 – Wet The Bristles
Run the bristles of your makeup brush under cool water to dampen them. Using cool water here is important, because hot water could melt the adhesives that help hold the brush together.
Equally important is doing your best to make sure that both the brush handle and ferrule (the metal piece between the handle and bristles) stay as dry as possible. The ferrule is delicate, and if water gets inside it can loosen the glue and cause the bristles to fall out.

Step 2 – Wash And Rinse
Squirt a small amount of dish soap or cleanser onto a silicone trivet. The trivet is optional, but it will help gently massage the bristles so they lather up faster than they would on, say, a small plate. You can also find silicone makeup brush cleaning mats that are designed for this purpose, but a silicone trivet works just as well and you can use it elsewhere for other purposes.
More Ideas You'll Love

Place the wet bristles of your brush against the soapy trivet and gently swirl it around to create a lather. Rinse the loosened makeup out of the brush, and repeat swirling and rinsing until water runs clear.

Step 3 – Dry The Brush On Its Side
When the brush is clean, give the bristles one last rinse and then use a clean towel to squeeze any remaining water out of the bristles. Set the brush across the top of a drinking cup (or set it on your counter with the bristles hanging off the edge) and allow it to air dry for several hours. It’s important to dry your brushes sideways to maintain the shape of the brush and to prevent any remaining moisture from seeping into the ferrule.
How To Clean Beauty Blenders/Makeup Sponges

You’ll need:
- Pint-size mason jar
- 1 cup hot water
- 1 Tbsp dish soap
- 1 Tbsp vinegar
Directions:

Step 1 – Soak And Shake
Fill a pint-size mason jar with 1 cup of hot water, then add a tablespoon of dish soap and a tablespoon of white vinegar. Place your beauty blenders or makeup sponges in the jar, then replace the lid. (You can clean several at a time as long as there’s a bit of extra room left in the jar.)

Let the sponge soak in the cleaning mixture for about 15-20 minutes. This will give the soap and vinegar time to break down the oily makeup residue that’s trapped inside. After waiting, shake the jar for about a minute.

Step 2 – Rinse And Dry
Remove the jar lid and dump out the dirty water. Rinse the sponge, squeezing it frequently in your hand, until the water runs clear. Set the sponge on a towel and allow it to dry overnight.

How Often To Clean Your Makeup Brushes And Sponges
You should use the methods provided above to wash your makeup tools every two weeks or so. For brushes that you use to apply liquid makeup like concealer or foundation, weekly washes will help you avoid product buildup.
If you’ve been known to procrastinate washing your makeup brushes, consider washing one brush per day after you finish doing your makeup. That way, all your brushes will stay relatively clean, but you won’t have to commit to any marathon brush cleaning sessions.
For beauty blenders and makeup sponges, most experts and makeup artists agree they should be washed after every use. Because they’re usually used while damp, they can quickly become an ideal breeding ground for bacteria.
More Ideas You'll Love


Where To Store Your Makeup Brushes
Once your makeup brushes are nice and clean, you can help keep them that way by storing them the right way! It’s best to keep makeup brushes covered when you’re not using them to protect them from dust and dirt.
A zippered pouch is a good choice, and you can fold it down while doing your makeup so your brushes are easily accessible. It you want something that can sit out on your counter or vanity, consider keeping your makeup brushes in a box with a lid.
And finally, keep in mind that no makeup brush will last forever! If you notice that any of your brushes is shedding, discolored, or has any sort of unpleasant smell, it’s time to replace it!
How do you clean your makeup brushes?

Cleaning Makeup Brushes (Step by Step)
Video
Equipment
- Silicone trivet
- Clean towel
Ingredients
- 1 tsp dish soap
Instructions
- Run the bristles of your makeup brush under cool water, keeping the brush handle and ferrule (the metal piece between the handle and bristles) as dry as possible.

- Squirt a small amount of dish soap or cleanser onto a silicone trivet or makeup brush cleaning mat, then place the wet bristles of your brush against the soapy trivet and gently swirl it around to create a lather.
- Rinse the bristles, then continue swirling and rinsing until the water runs clear.
- When the brush is clean, rinse the bristles thoroughly and use a clean towel to squeeze the remaining water out of the bristles. Set the brush across the top of a drinking cup and let it air dry for several hours.


Another Dawn commercial! Anyway, just do what I do and DON’T wear makeup then you won’t have makeup brushes to clean. I’ve never been a makeup wearer. I’ve never felt the need to “put on my ‘face'” before leaving the house. The face God gave me has always been good enough for me. It doesn’t need any artificial enhancement. Besides, all makeup does is clog your pores and gives you wrinkles. Another plus to not wearing makeup? If you DON’T put it ON, you won’t have to WASH it OFF.
Please log in or create a free account to comment.I use cleaned glass yogurt containers for brushes. Just soak off the label. Dry them and pop the brushes in with the brush side up.
Please log in or create a free account to comment.I have several glasses grouped together. One for brushes for eye makeup. One for lipsticks and/or other small items that will fit in them. Most useful things. You can also use voltive candle holders but the yogurt glass containers are a little higher and free.
I actually was able to locate a silicon trivet for cleaning my brushes from Target. A makeup artist I follow suggested using a plant based soap like Meyers brand . The soap uses natural essential oils .- so it’s less likely to dry out the bristles of the brush. I’ll have to re member to try using the Cetaphil cleaner for this.My main issue is its expensive – even the store brands are .
Please log in or create a free account to comment.How clean makeup brushes – With the daily grime comes consequences like breakouts, congestion, and skin irritation.
You are article has been writing so will I love your article but And some of us have written about How Clean Makeup Brushes
https://fashiontranding.com/how-clean-makeup-brushes/
Please log in or create a free account to comment.I worked in Cosmetics for 20 something years and besides the bacteria and clogging your pores , you will never have the true color you are aplying , my habit is that after I use my brushes I wash them right away with Dawn but I also add white vinegar to really desinfect and “cut” the foundation , since my skin is dry my foundation has to be rich , then yes lay flat and use a towel to squeeze the extra water , I also use every other wash baby shampoo and conditioner , some of my Chanel brushe are 15 years or so and they perform like new.
Please log in or create a free account to comment.Make sure you have your brushes laying down to dry. This is an art teacher trick for drying brushes. If you stand the brush up, the moisture seeps down and collects in the ferrule, which will rust and the bristles will fall out sooner than need be.
Please log in or create a free account to comment.Best kind of person to have advice for brush cleaning! Thank you!!
Please log in or create a free account to comment.Thanks for this great tip, Judi!
Please log in or create a free account to comment.I have to admit that I’m really surprised that women didn’t know this. I have washed my make-up brushes for years, simply because when I started using make-up the Merle Norman lady told me I should wash the brushes at least once a week, more often if possible. I thought every make-up place told clients this.
Please log in or create a free account to comment.Where can I buy a silicone trivet?
Please log in or create a free account to comment.Right here :-) http://amzn.to/2uRXEd4
Please log in or create a free account to comment.I just bought some of these for myself and a friend. Thanks for the idea! I really enjoy your blog and Sour Cream Cookies are on my agenda this week:)
Cetaphil sounds like a logical idea. So does Dawn. If it’s gentle enough to clean wildlife after an icky oil spill, it couldn’t’t do much damage to natural hair brushes. It’s fantastic on my dishes! I’ve tried a moisturizing shampoo and conditioner but getting things down to one step would be nice. The only other product I’ve tried is Wen since it doesn’t have the sudsy chemicals in it. The brushes get clean and stay soft but I always like new options. I will try Cetaphil the next time I clean my brushes. Thanks Jillee and Janet!!
Please log in or create a free account to comment.Thank you, Maggie May! I never even thought of using Wen to clean my brushes! I have a large bottle of it sitting under my cabinet taking up too much space. I stopped using it in favor of a different co-wash but I didn’t want to toss it out either. I’ve been using a facial cleanser that I got in an Ipsy box that I hated for my face (sorry Paris Hilton LOL!) but it works well for cleaning my brushes. Thanks again for the great tip!
Please log in or create a free account to comment.I wash my brushes in Cetaphil cleanser -it’s what use on my skin. I do like the silicone trivet idea-I will look for one . I also like to dry the brushes outside on a sunny breezy day. I figure the sunlight and fresh air are good for dry I g them quickly.
I lay my brushes on a small slotted trivet, for good air circulation, but I store them in my make up bag, not out on the counter. I like to keep them with the product they are used for. I prefer to keep the counter uncluttered.
Please log in or create a free account to comment.I got into the habit of washing one brush a day every morning after I put my makeup on. I can’t believe how much better the brushes even feel. I’ll have to look for one of those mats! Thanks!
Please log in or create a free account to comment.That’s a great idea!
Please log in or create a free account to comment.This is a different subject but wondered if you had any suggestions. my son put a part from his boat that had two black suction cup plastic type things on the vinyl seat covers of the boat and left it for several days. when he removed it, there were two perfectly round stains that he has not been able to get off the vinyl seat cushions.
Please log in or create a free account to comment.Would you have any suggestions of something he could try to clean it with. He has a beautiful boat and this has been devastating. I told him to let me try to get a response from Jillee before he takes it in to try to get new cushions. I LOVE your column. Thank you so much.
This is a good reminder – I have good intentions of cleaning my brushes regularly and then suddenly six months has gone by! I use my daily facial cleanser for cleaning them as I figure it cleans the makeup off my face, should work on getting it off my brushes.
Please log in or create a free account to comment.I use cooking oil to clean mine, it saves a LOT of time. I pour a couple of tablespoons of oil in a small bowl and swish the brush through it several times. Quickly wash the brush with a gentle soap and you are done!
Please log in or create a free account to comment.I use a 9 oz plastic cup with tapered sides, add some shampoo (hair is hair) and hot water up to the base of the bristles. Leave it for a few hours and rinse well . Then I spin the handle between my palms to get out most of the water. Since mine have flat ends, I stand them up and let them dry overnight. Works great. If they are really icky, I will dump the soaking solution after an hour or so, start over and finish the process. If you are in a hurry and your brush is not dry…hair dryer on a medium-low setting for a few minutes. (hair is hair)
Please log in or create a free account to comment.Love this. I’m so bad about not cleaning my brushes. Thanks for the tip on the silicon trivets. I just returned from vacation and the brush holder would have been very nice to have. I’m the only one of the girls who uses them. Anyone have any ideas where else you can find a sushi mat?
Please log in or create a free account to comment.Try the grocery store, I have seen them in there. Or Big Lots. An oriental store would be good too.
Please log in or create a free account to comment.You are amazing. Great idea on the mat storage. I am going to make one.
Thank you so much for the great solutions.
Please log in or create a free account to comment.This is great! Thank you so much. I don’t clean my brushes as often as some, but then I don’t use make-up every day. I rarely use any at all. And if I do, it’s mineral make-up, a little blush, maybe some mascara, and lipstick. Usually, it’s just lipstick.
Please log in or create a free account to comment.I know that I should wear it more often, but I don’t. I do wash my face and moisturize. I like all natural make-up, too. As in DIY.
Thank you for this great tutorial on cleaning makeup brushes. I’m on the lookout for a silicone trivet now.
Please log in or create a free account to comment.I get mine at the 1$ store usually 2 in a pack!! LOVE them !!
Please log in or create a free account to comment.Dear Trish,
Thanks for the lead! I was planning on an internet search for silicone trivets. Lol Now, I just stop by the $1 Store on the way to Michael’s.
Amazon! They have everything under the sun.
Please log in or create a free account to comment.I learned a lot from your post on cleaning brushes. Thank you!
Please log in or create a free account to comment.