


It’s a new year and I am MOTIVATED to get better organized! The day before yesterday my youngest and I started with his room. Grandma Nystul was coming to visit and since Sten’s room is the “guest room” when she is here, we had an impromptu purging and organizing session in advance of her arrival.
Yesterday, I decided to get started on another organizing project I’ve been meaning to tackle….my Christmas decorations. Ever since I first got married I’ve stored our ornaments, etc in cardboard boxes (which are in pretty rough shape now.) This year I was determined to find a better option.
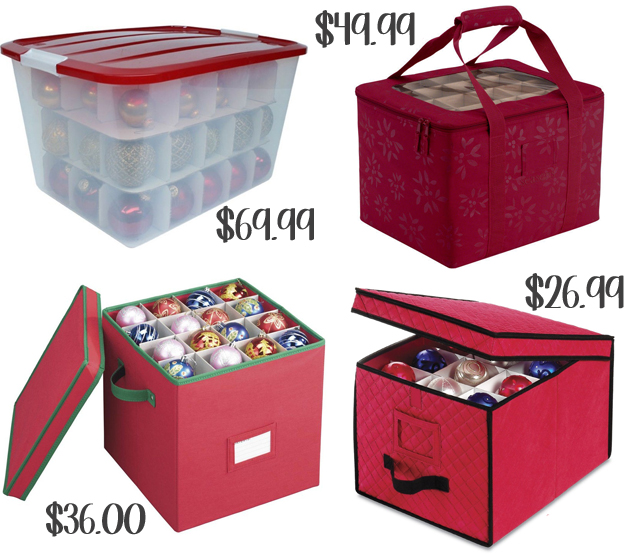
After looking around online at the PRICES of the “better options” out there I decided a “DIY option” was in order.

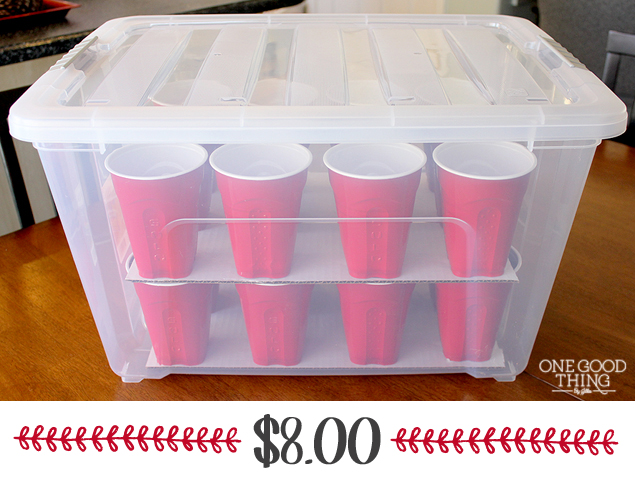
So the day after Christmas I made a quick trip to the outlets near our home in search of a deal on some storage boxes. I SCORED when I found these large, see-through plastic bins with lids at Staples for half price…$7.00 each.
Now all I needed was a couple of pieces of cardboard, plastic cups, and my handy glue gun to create a my own version of an idea I had spied on MarthaStewart.com.
Despite the fact that yesterday was New Year’s Day and I prepared two large meals (one for a friend and one for my family) I still had time to create this because it was so quick and easy!

Make Your Own Christmas Ornaments Organizer Box
What You’ll Need:
- Large storage bin of some sort
- Cardboard
- Plastic cups
- Glue gun & glue sticks
Directions:
Simply cut your cardboard pieces so that they fit inside the bottom of your box. Depending on the height of your cups and the height of your box, you should be able to fit at least two layers. Maybe even three if the cups are shorter than mine.

More Ideas You'll Love

Apply glue to the bottom of the cups (it might melt a little but you’re not going to be drinking out of them, so it’s fine!)

Attach as many as will fit evenly on your piece of cardboard. Repeat with 2nd piece of cardboard.
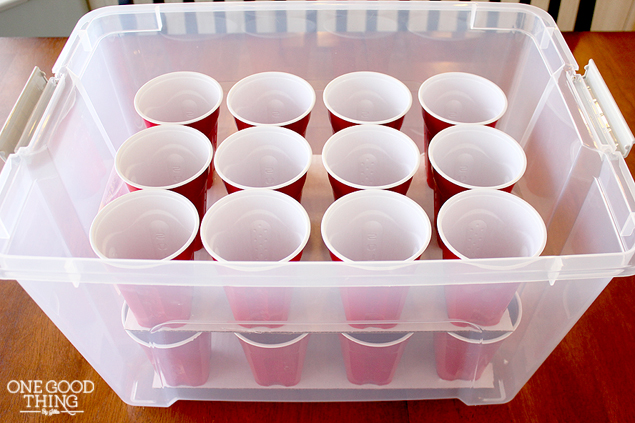
Now stack on top of each other in the box and you have your own compartmentalized ornament box for a FRACTION of the cost of the ones online or in the stores.
Total price of my DIY Christmas Ornaments Organizer???
The ornaments on my tree now have a safe and secure spot to rest during the off season.

They look pretty happy about it don’t you think? OK…actually Santa is looking a little confused and maybe even mad here…but that’s just because he needs a VACATION! :-)
More Ideas You'll Love

Now to tackle the REST of the house! In the words of Scarlett O’Hara ……I’ll think about that tomorrow.


I really like everything. Sorry for any mistakes, but my native language is Brazilian Portuguese. I use Google Translate. Thank you for your great ideas.
Please log in or create a free account to comment.Great site. Lots of beautiful pictures.
Please log in or create a free account to comment.Expandable file folders are also good for storing materials and will fit in a filing cabinet.
Please log in or create a free account to comment.These pictures are so pretty. I love how you display your boxes.
Please log in or create a free account to comment.I buy the sheet protectors that have the top that folds over then I keep it all in a notebook so I can put it on a shelf at the end of the season. Plus, I travel so a notebook travels better for me.
Please log in or create a free account to comment.Good post. I be taught one thing more challenging on totally different blogs everyday.
Please log in or create a free account to comment.It’ll all the time be stimulating to read content from other writers and apply a little one thing from their store.
I’d choose to make use of some with the content on my blog whether or not you don’t mind.
Natually I’ll give you a hyperlink in your web blog. Thanks for sharing.
Beautiful! In light of maintenance, when using paper to repurpose and decorate boxes, plastic wrap another layer over to protect your newly covered boxes from dampness and getting damaged. It may ruin the texture of your design, so have a think on how long you’d like to keep them.
Please log in or create a free account to comment.If you like reading a blog, what kind of interesting things that make you like that blog? Give me your favorite blog links too..
Please log in or create a free account to comment.These are nice boxes if you are planning to store your Christmas ornaments in a moisture-free/pest-free location (not an attic, garage or basement).
Please log in or create a free account to comment.Happy New Year! I love this idea and I will be doing this as the box I have has seen better days. I save paper towel roll and wrap my lights around those.This makes it so easy to unwrap them since they are not tangled up.
Please log in or create a free account to comment.I’ve been using ornament storage boxes for years. THIS year, I decided I didn’t want to wrap my antique village, my santa, snowmen, and moose collections… you get the idea, into separate boxes which are stored in clear storage boxes. This box of boxes was too much for my husband and I too manage getting out of the attic!
While out shopping at Bed, Bath & Beyond after Christmas, I found three-layered, hard plastic, ornament boxes with cardboard dividers. I bought 3 of them. The cardboard dividers can be used as is, or bent and cut to size. Now, packing up was a DREAM and everything that I hold dear are laying in beds of tissue paper and separated from each other. No more breakage. Easy, Schmeazy, Lemon Squeezy.
Please log in or create a free account to comment.I love the posts and the comments too! Always a treasure trove of ideas!
I have one extra large bin on wheels for my ornaments. I keep all the original boxes…which I know doesn’t help most people now. But I also keep small shoe boxes and the like for stacking in the bin. And I try to keep any bubble wrap and tissue that comes from gifts to use between ornaments. And I try to keep similar ornaments together. Like, one year my mom made her own bread dough ornaments. They are all pretty small, but they are fragile. So I wrap each with tissue and then put them all together in a small shoe box. I’ve also got a bunch of crocheted ornaments my great aunt made, and they are like little pillows, so they all just go in a ziplock bag. Also, when my preschooler’s class made handprint ornaments, everyone took an ornament, but I kept the empty boxes for myself. Now I have a place to put all 6 of those handprint ornaments my kids brought home over the years.
The trick of course, is fitting all my shoe boxes and hallmark ornament boxes and such in the bin. It’s always a challenge…like packing luggage…but I just start with the big boxes first…fill in odd spaces with little boxes and work my way to the top.
Hope this helps someone. :)
Please log in or create a free account to comment.I too have most of the original boxes our ornaments came in, labeled with the date etc….(to pass on to my girls when they leave the nest), however, it has become a tedious task putting each ornament back into its appropriate box. I love this idea! When the time comes to pass on the ornament, the girls will get them in their corresponding boxes… until then, I am going to try this out. Thanks for the great idea.
Please log in or create a free account to comment.We make our own partitions similar to the wine bottle boxes by buying poster board at the dollar store.
Cut them the height of your ornament and the length of your heavy duty cardboard box. Then cut strips that match the width. Then figure out your spacing of each ornament and cut your lengthwise and widthwise pieces half way up each one so that you can interlock them. Then lay a full piece of poster board between each layer of ornaments. You’d be amazed at how many you can get into a box for storage. We have found the best boxes to use are bankers boxes.
Please log in or create a free account to comment.wow, great ideas:), just reading all of them a couple days late, already took all my ornaments down, but will certainly be doing this for next year. and what a great idea for that hard to buy for friend, make them one of their own:) HAPPY NEW YEAR keep the ideas coming.
Please log in or create a free account to comment.As for the lights, I use a piece of cardboard (side of a box). Slit the opposite corners, insert an end and wrap around, inserting the opposite end. I then label the board for length or number of lights on the strand. This has made wrapping the tree next year very easy and I can store numerous strands in a larger box.
Please log in or create a free account to comment.Happy 2014…
Please log in or create a free account to comment.Have you another idea, to strage christmas light??
Thanks to be there
FSC
Thank you so much Jillee for this idea. I’ve been unwrapping and rewrapping my fragile ornaments for years. This made undecorating the tree a real chore. I’m going out to get a glue gun. I already have a bin, the cups and cardboard (and oh yeah, lots of ornaments).
Please log in or create a free account to comment.I was going to do this actually just the other day when I saw my cups were way to big for the ball ornaments and I thought they would break. After going to the container store and talking to the saleswoman about their box, I realize even their expensive box they recommended buying shredded paper to fill the bottom and sides with to keep it protected and from shifting. I agree with the comment above that this is the missing piece in this suggestion. For those that say they have way too many ornaments to do it this way, I found that you can put several ornaments in a cup if you just use the shredded paper to create a buffer between them.
Please log in or create a free account to comment.I would just like to say that I did this to, and I really like the idea. There is just one problem with this idea. I had mine in the basement and my young cat Emma, decided to knock it down. With the hot glue, it dries and cracks, so I ended up with smashed ornaments, when it came crashing to the floor. It broke several ornaments, because the hot glue was dry and not very flexible! After this happened, I redid it with tacky glue and it seems to do better. Just wanted to tell you my experience with it! I would not recommend hot glue, but a white glue for better holding power!!
Please log in or create a free account to comment.Shoot. Read this one too late. I went to Joann’s yesterday and got a stackable snap together organizer for half price. I’ve been meaning to go through all of the kids baby ornaments though so this could still work for me. I have a bunch of file boxes from staples, bet I can rig something up with them. I don’t care if the boxes only hold so many, because ornaments piled together like they are, get broken. I was using big ice cream tins, but anything that sticks up doesn’t fit. Thanks for the great idea!
Please log in or create a free account to comment.what an awesome idea!!
Please log in or create a free account to comment.A FREE option to use are the boxes that hold wine bottles. They come with built-in dividers, and each divider can hold a couple of wrapped ornaments. Just go raid your local grocery / liquor / Costco stores.
Please log in or create a free account to comment.This is one of the better ideas I’ve seen for DYI ornament storage!!!!
Thank you
Please log in or create a free account to comment.These look great–but would take up too much room for 24 ornaments. I’d like to share what I do.
Please log in or create a free account to comment.Over the years we have eaten many Harry & David pears; the boxes for these pears are a dream. They come with foam on the bottom & an easy lift of foam on the top and in between there are cardboard dividers. The boxes easily stack, I tie 3 together with string which prevents too much up & down from the attic. Only the heirloom ornaments get the pear boxes, the rest go together in one box without wrapping individually. Let’s face it, most of us have so many ornaments that the few we lose each year due to overcrowding, are a forced purge blessing. The heirlooms are snug & safe. As I pass heirlooms down, I pass box & all. I have 2 boxes left. I do have plenty run of the mill ornaments, which I purge (without a heavy heart) when I discover breakage.
I too think this is a great idea for storage! With a bit of tissue, or paper towel or napkin, or a tissue from the box, it looks to me that more than one ornament could be stored in each cup. We have a couple plastic containers with the ready-made partitions, and I’ve always been able to store more than one ornament in each section. We counted our ornaments a couple of years ago, and we had over 600, and somehow my husband gets all of them on our tree! We are always looking for good storage hints. Thanks, Jill. Love your blog.
Please log in or create a free account to comment.Hi Jillee: What a great idea! So much less expensive than the “ready made” bins.
Please log in or create a free account to comment.Thanks, AGAIN, for such a great idea.
Sheila
You can even use some of your gift wrap that you have shredded (or even mail or bills that you shred to prevent ID theft) as filler for the cups to cushion the more fragile items. I agree with some of the comments that this might not work for everyone but it’s a great sounding board for generating more ideas that might give someone else an idea of how they could fix their problem.
Love all your ideas and wish you and yours a Happy, Health and Prosperous 2014!!
Please log in or create a free account to comment.Two things: to reduce silverfish, etc.m sprinkle a tiny bit of powdered detergent or cinnamon on the bottom of the bins. To reduce mice: DONT store leftover candy canes or gingerbread houses, no matter how sentimental! Trust me on this one.
The COSTCO Apple tray idea is brilliant! The solo cups are too, AND, you can sort of hook the hooks around the rims, which will alleviate some of the tangling.
Light storage suggestions, anyone?
Please log in or create a free account to comment.Years ago I bought some fairly cheap plastic containers at Target (I think): one for gift wrap & one for lights. The containers have a “corrugated” looking white plastic box & green lid, and they aren’t heavy duty, but they work fine. The light box came with four spools and each spool has removable ends and the ends have slots to anchor the cord while they are stored. These work great for me. Each strand goes on one spool and this keeps them from tangling. I also keep spare fuses & bulbs in the box with the lights so everything is together and nothing is a tangled mess.
Please log in or create a free account to comment.Thank you, KC… I hadn’t thought about silverfish in my ornaments. But will put something with cinnamon in it inside the containers. I use the clear totes, too. But I wrap each ornament and other decorations in tissue paper. So far, I’ve had no problems with anything breaking or finding bugs. I love Christmas, so I have several totes full of things I’ve collected over the years… Thanks, Everyone, for all the awesome ideas!!!
Please log in or create a free account to comment.I think this is an excellent idea! I might take it a step further by cutting the cups down to match the size of the ornaments to save space and layering same-size cups/ornaments together. It might be a little trickier to glue, but you could even use the larger top half of the cup. I love the idea someone had about using the clear cups, too!
Happy New Year!
Please log in or create a free account to comment.Love this, Jillee! Pinned!
Please log in or create a free account to comment.You can make it for even less if you use those cardboard boxes that you have from Christmas presents (you know you have them) . Just cut them up using the one box you did pay for. It is an easy half cut on the narrow board.
Please log in or create a free account to comment.I do love your site.
I have a few of those gift boxes that I use to organize different types of ornaments in my big totes. I wrap some of the individual ornaments in paper towel and reuse them forever… and store quite a few of the gift boxes filled with smaller ornaments in them. That works great for me.
Please log in or create a free account to comment.Great idea! We have a heavy cardboard box that has seen much better days, and I love the plastic bin’s long-term storability, and that you can see into it. I will try it, but use clear cups.
Please log in or create a free account to comment.One of the things I love about your posts are all the ideas generated in the comments, that spring from whatever your One Good Thing is each day. Which really turns that One Good Thing into several different versions of the One Good Thing, so if something is great but doesn’t quite work, someone else may have a tweek that would make it work (for example Sharon H’s comment basically explained why today’s won’t work for her but Christine’s post gives some ideas that might)
I have a couple plastic totes that came with the cardboard dividers, and they tend to start breaking down, and smaller stuff slips down the sides. Oh, and the hooks get caught on the cardboard dividers and pull off the tops of my balls when I pull them out. This would be a great way to fix those problems – for even less since I already have the totes and base cardboard, just need the cups :-)
Thank you for all of the great ideas you give us, and for trying things out (to be honest I come here before Pinterest because I know you have tested it, reducing the chance of a fail). THANK YOU!!!!!
Please log in or create a free account to comment.Amen Dawn! I completely agree. I think the COMMENTS generated are WAY better than the posts!! :-) I do!
Please log in or create a free account to comment.hi jillie, i just love your ideas and your website as well. I have made several items from you. you have the best hints, tips and I love your ornament box, the way you did it the box could be used for other storage ideas as well. may you and your family have the best 2014….looking forward to all your posts. thank you so much for sharing.
Please log in or create a free account to comment.Thanks to purchasing our apples by the dozen at COSTCO I store the large round ornaments in the clear plastic apple containers. In a 66-quart Sterilite container you can lay two apple forms side by side. 24 ornaments on each layer is handy. Egg containers work great for the smaller round ornaments. Any wooden, metal, foam, or other unbreakable ornaments I store in shallow flat boxes which fill up the Sterilite completely. Thanks Jillee for One Good Thing. All those little things really matter!
Please log in or create a free account to comment.LOVE this idea!
Please log in or create a free account to comment.That’s exactly what my parents do! They saved some of the plastic apple containers from Costco and store ornaments in those, then in bigger plastic crates. Brilliant!
Please log in or create a free account to comment.I can see the theoretical value to this idea, however I have way too many ornaments/decorations to store like this. By wrapping my pieces and organizing them in various ways (like items, similar sized items, etc) I can place them in smaller, appropriate sized boxes, or sometimes just zip topped bags, and pack this container FULL. I don’t have the space for 8 or 10 big bins that only hold a handful of pieces. I think it’s great if this works for you, but I have to “micro-manage” all my “stuff”! I could probably get rid of some things, but not enough to make that big of a difference. I have opted to not add a lot every year…saves me a lot of money…time….and storage.
Please log in or create a free account to comment.Just wanted to say:
Please log in or create a free account to comment.1) Thank you, for what you do.
2) Happy New Year! May it be better than the last!
Hi Jillee, love your idea. I came up with my own decoration storage idea 2 years ago. At the after Christmas sales ornaments go really cheap and I’d been buying for a few years. I found I had heaps of ornaments. I hate having the same decos year in year out. I came up with the solution of colour coding my decos. I got storage bags cheap at the sales and each bag has one colour in it. Eg gold in one, silver in another, red in another. I put each size and type of baubles etc in resealble plastic bags. Eg, for red I have little apples, these go in one plastic bag. Now every year I choose a different colour and as each colour has different ornaments the decos change. Eg in the gold year I trim my tree with just baubles in gold. I have so many balls in gold ranging in size from small to large that every space is filled on the tree. It looks stunning. I have a fibre optic tree so don’t have to worry about lights. I have 4 bags of decos, so each year I have a different look in the house. I also store my Christmas linen and room decos in the appropriate colour bag. All I have to do is pull out the bag of the colour I chose for the year and everything I need to decorate is in it. Saves so much time and space.
Please log in or create a free account to comment.Helen
YOU READ MY MIND!!!! I’ve been figuring out how to store these things!
Please log in or create a free account to comment.Super idea :) Love it! Great job Jillee especially after cooking two meals.. Super :)
Please log in or create a free account to comment.