


Here on my blog, I strive to share simple, everyday tips and tricks that can help make your life a little bit easier. But sometimes, the tips that I want to share aren’t something I can write a whole blog post about!
And since I simply cannot waste a good idea, I tuck them away to use at a later date. Today I’ll be sharing some of those tips and tricks with you in the nineteenth edition of my ongoing series “Why Didn’t I Think of That?”
Missed the last installment, or want to revisit some of your old favorite tips? Check out the entire archive of the “Why Didn’t I Think of That?” series at the bottom of this post!
Be sure to scroll down to see some of these brilliant hacks in action on video!

1. Put a Mini Diffuser Anywhere
Diffusing essential oils is an easy way to freshen up the air throughout your home (or car). But wouldn’t it be nice if you use essential oils to freshen up smaller and smellier spots around the house, like the inside of your trash can or the hamper where you put your dirty laundry?
You actually can, and it couldn’t be quicker or easier to do! Simply stick a small felt pad (the same ones you’d stick on the bottom of furniture and chair legs to protect your floors) wherever you could use a scent boost, then add a drop or two of your favorite essential oil to it.
I’ve already put up a few of these DIY “mini diffusers” in my laundry room and closet, and I think they’d be equally useful in diaper pails, gym bags, and anywhere else too! I’ve been loading mine up with a few drops of sweet orange essential oil because its fresh and cheerful scent is perfect for chasing away the winter blues. :-)

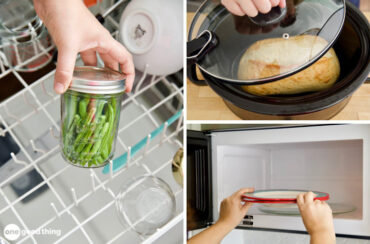
2. Freezer Bag Solution
While vacuum sealing foods before storing them in your freezer is the best way to keep it fresh as long as possible, it’s not an ideal solution for ingredients you want to use a little bit at a time, such as smoothie ingredients, frozen cubes of fresh herbs or leftovers, etc. Ziplock freezer bags are a more convenient option for storing these items, but the emptier the bag gets, the harder it becomes to avoid freezer burn!
But there’s a quick and easy solution to this particular problem. When the bag is less than half full, cut the top portion off the bag in a straight line. Roll or twist the bag to close it up, then use the portion you cut off to tie it up tightly.
Not only is this method a simple and effective way to reduce the chances of freezer burn, but it’s also less wasteful than transferring the food to a new bag!

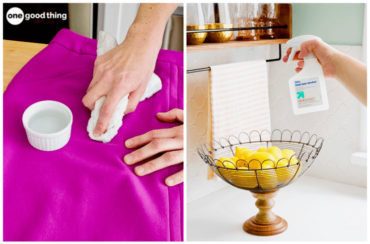
3. Makeup Brush Drying Rack
You just washed your makeup brushes to eliminate product buildup and bacteria… so now what? The safest way to dry makeup brushes is to air dry them upside down, and there’s an easy way to do it!
Grab one hair tie for each makeup brush, and place the hair tie against the backside of your towel bar. Take one of your brushes and hold it upside down in front of the towel bar, then fold the top and bottom of the hair tie over the towel bar and slide the brush through the two “loops” to secure it.
Once all your makeup brushes are suspended upside down, allow them to air dry completely. No need for any fancy drying racks here!

4. Extra Large Ziplock Bag
In instances when even a gallon ziplock bag isn’t big enough, you can combine two of them to make an extra-large ziplock bag! Just open both bags, flip one inside out, and fit the “tongue” portion of one bag into the “groove” portion of the other.
Press the seals firmly all the way around to make sure it’s closed properly. Your new two-gallon ziplock is perfect for storing larger food items, or even dirty shoes that you’re packing into a gym bag or suitcase.
More Ideas You'll Love


5. Clipboard To-Do List
If you or your family has a set list of chores that you repeat daily or weekly, you can easily keep track of those to-dos with a clipboard and a handful of binder clips. Start by writing out each of the tasks along the left edge of a piece of paper, continuing along the right edge if you have a long list. (You can also type it up on your computer, arrange the text into two columns, and align the text to the left and right edges of the paper.)
Once you’ve got your checklist written or printed out, clip it on your clipboard, then clamp binder clips to the side of each task. After finishing a task, flip the metal arms back so they rest against the clipboard to indicate the task is done. (The little “click” of the metal hitting the board is highly satisfying!) Resetting your list is as easy as flipping the metal arms of the clips back out again.

6. Better Biscuits
Homemade biscuits are a breakfast staple, especially when you’re in the mood for something satisfying! If you make yours from scratch, you may have heard that twisting your cutter when stamping out biscuit dough is helpful, but that may not have been good advice after all!
Twisting your biscuit cutter can seal the outer edges of the dough, preventing the biscuit from fully rising as it bakes. Instead, cut your biscuits by pressing straight down with a well-floured biscuit cutter, which will keep the edges open and help your biscuits rise high!

7. Maximize Your Fridge Space
Tired of playing Tetris every time you want to stick something in the fridge? Utilize the vertical space left in your fridge by placing a cooling rack on top of a bowl, casserole dish or other large item, and then you can stack things right on top of the rack!
Don’t have a cooling rack to spare? Try using chopsticks instead.
VIDEO: Make More Room In Your Fridge INSTANTLY!

8. Safer Scrubbing for Cast Iron
Can’t find the right scrubber or brush to keep your cast iron pan clean? Try a traditional Tawashi brush! These Japanese brushes are made from tightly wound palm fibers that are sturdy enough for scrubbing, but gentle enough that they won’t strip away your cast iron’s seasoning.
And since these brushes are made from organic, biodegradable material, they’re a great choice for the environment too!
The “Why Didn’t I Think Of That?” Series
More Ideas You'll Love

- For even more simple tips and tricks that will make your life easier, check out the other installments in this series, including ones you may have missed!
- Explore the “Why Didn’t I Think Of That?” series archive.


Wonderful suggestions and I like the recipe in the plastic sleeve. Mine always lays on my cookbook rack but can sometimes slip. The half empty bags of veggies I just fold down and use those wonderful binder clips to secure the bag. I also learned a trick for when a bag is tied in a knot and can’t get it untied, like when you get take away and get it home sometimes you have to cut the bag to get to the food. If you put your fingers on the knot and the top part of the loop should be in your right hand. Twist it until it start to tighten and then push it up thru the knot. It also works on the mesh bags that hold grapefruits and those bags are nice for other things. Thank you for collecting all these nice ideas for your readers.
Please log in or create a free account to comment.Thank you Jillee, I can now read the comments.
Please log in or create a free account to comment.You can also put the essential oil’s on a cotton round for freshening trash cans , etc. My sister actually uses the plastic covers for her recipe binder. She finds a lot of her recipes online – like me.
Please log in or create a free account to comment.These are all GREAT ideas/hacks! Thank you! I really thinking I’ll be using all of these tips.
Please log in or create a free account to comment.Oh my gosh! I love that idea on mini diffusers using small pad protectors!!!
Please log in or create a free account to comment.Jillee: I also wanted to tell you that I think you would make a good duo with the Pioneer Woman ! Cooking is great but throw in some time saving tips for cooking, the household and yourself and you have the makings of a great show!!! You should think about it!!
Thanks again!!!!
The dollar stores have cooling rack super cheap – would work great for your fridge stacking of dishes. Thanks for all you do Jillee – you are my hero❣️❣️❣️❣️
Please log in or create a free account to comment.Here are two ideas to consider…
When I find a good recipe online, I save it in a binder in a plastic sleeve. If it turns out to not be a “keeper” for whatever reason, I can just remove it. Having it in the plastic sleeve allows me to remove it from the binder and have it near my prep area. This leads me to my next tip…
I like to have my recipes at eye level so I put a removable hook (small Command ones are good) and stick it on my backsplash just below my upper cabinet. I then put a small binder clip on the hook to hold the recipe. The recipe is very visible, removable. And because it is in the sleeve, it doesn’t get dirty from splashes or messy hands.
Please log in or create a free account to comment.Helena…that’s good enough to go in Jillee’s “Why Didn’t I Think of That”! Awesome idea. :>)
Please log in or create a free account to comment.Some really great suggestions here-Thanks!
Please log in or create a free account to comment.One comment on an image: don’t use soapy water on your cast iron pan! Soap removes your pan seasoning more than a scrubber. Instead, while pan is still hot from cooking, just use hot water & your scrubber to wash away any food then rinse. Wipe the pan dry, rub it with a very thin layer of canola or vegetable oil, then put it back on the warm burner (or upside down back in the oven as it is cooling.) This will help maintain that cast iron pan seasoning you have worked so hard to achieve!
The dish soap we have today will NOT remove the seasoning on cast iron. The homemade LYE soap from many years ago is the soap you shouldn’t use to wash cast iron. Cast iron collectors use a solution of lye and water to strip and clean dirty cast iron before they season it. I have done it myself and I wash all of my cast iron as needed with regular dish soap.
Please log in or create a free account to comment.